


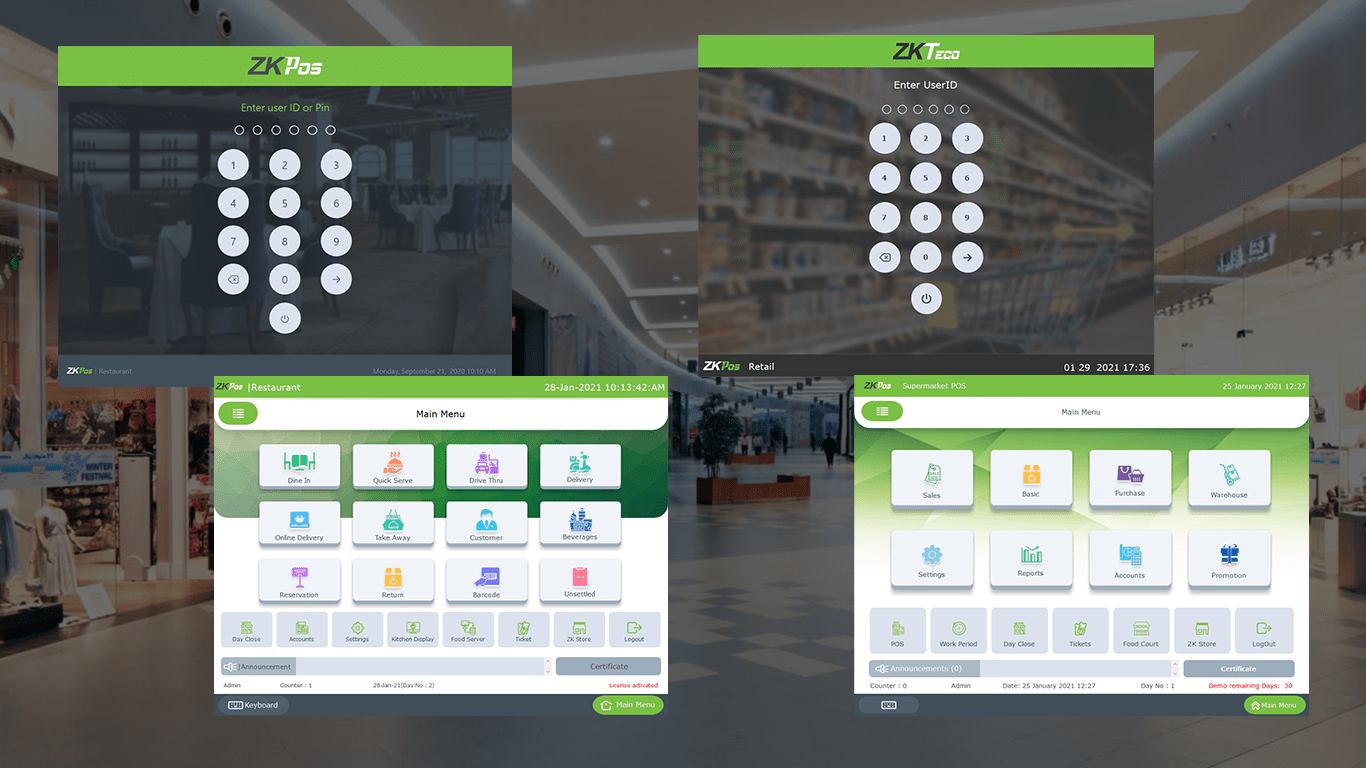

General
-
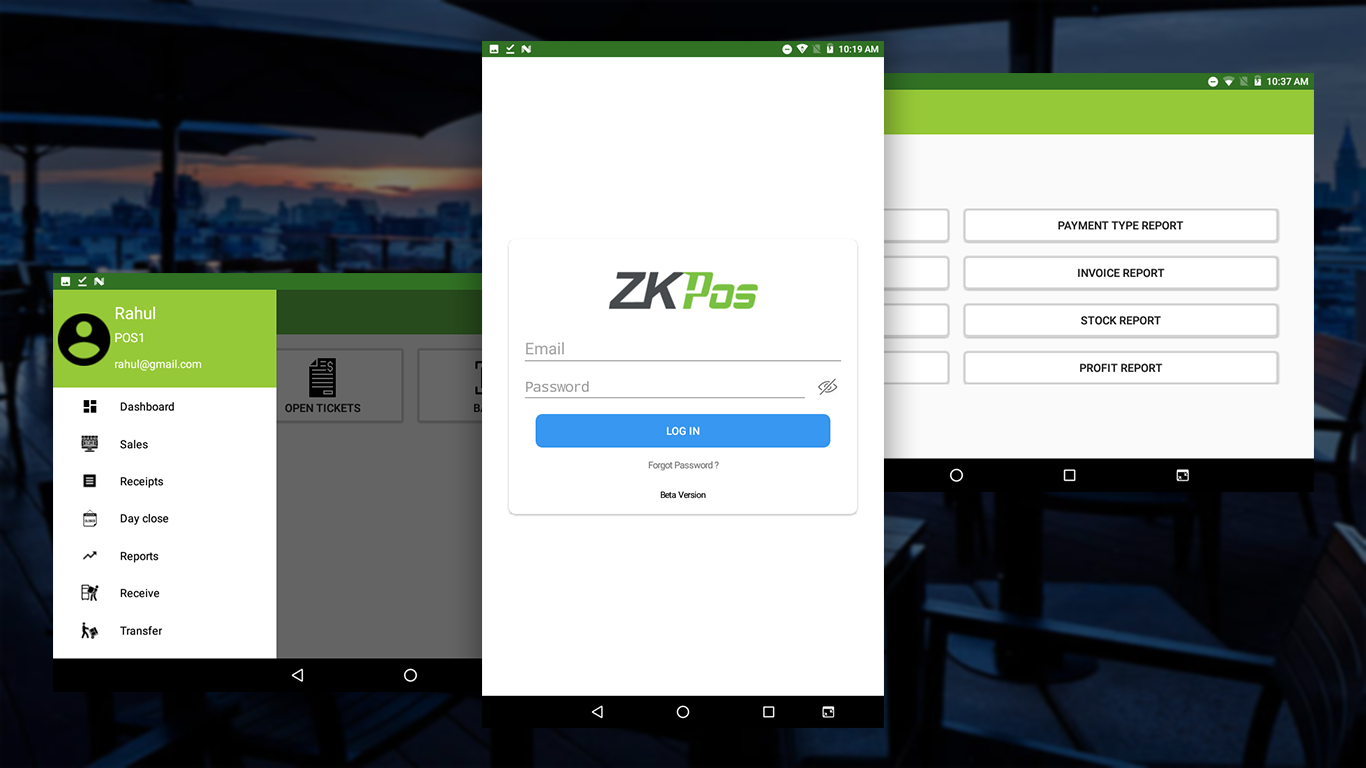
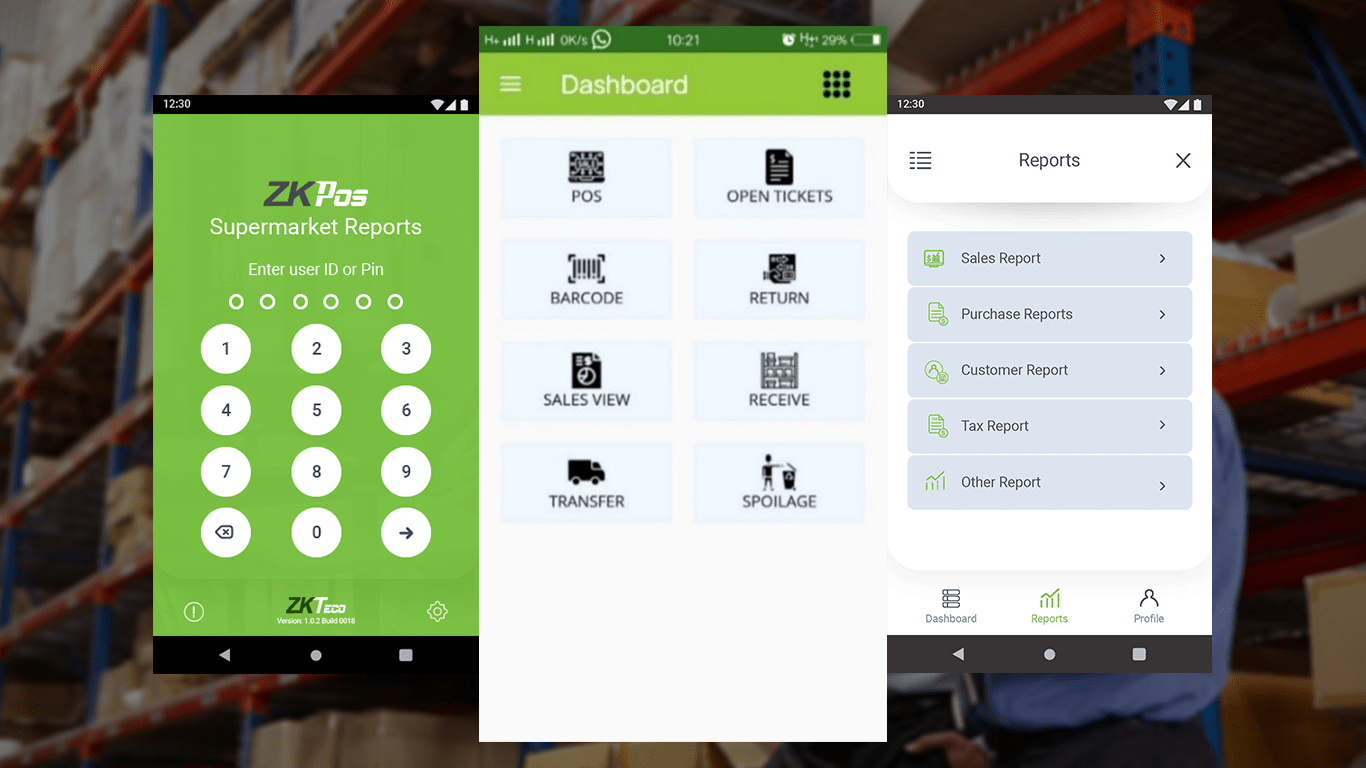
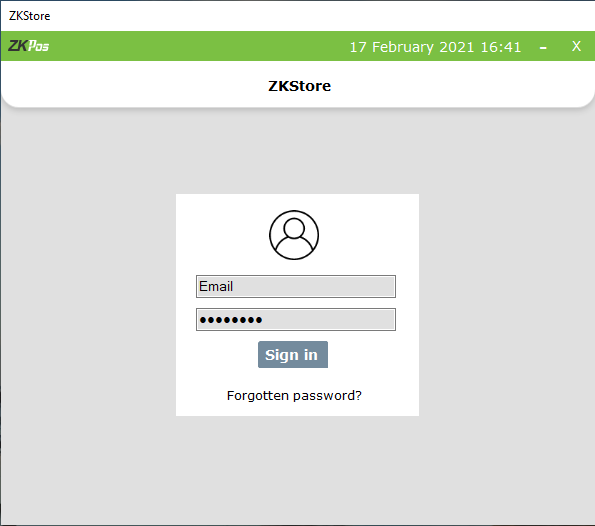
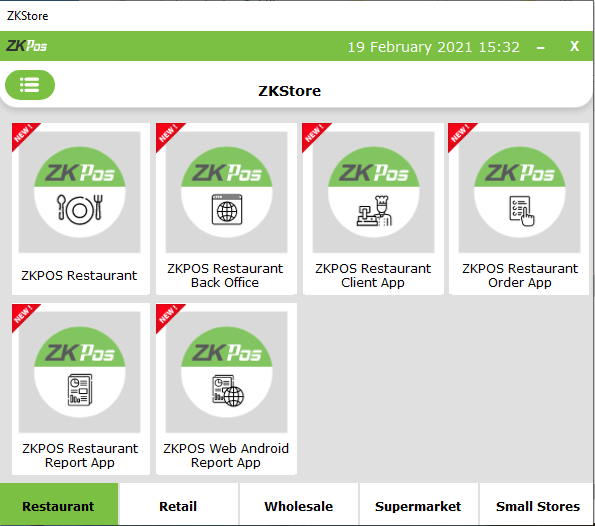
Where do I get ZKPOS Software? How can I download it?
You can download the ZKPOS Software from ZKStore (ZKPOS Software Downloader).
• Go to "https://zktecopos.com/"
• Select Support>> download centre>> software
• Click on ZKstore.exe
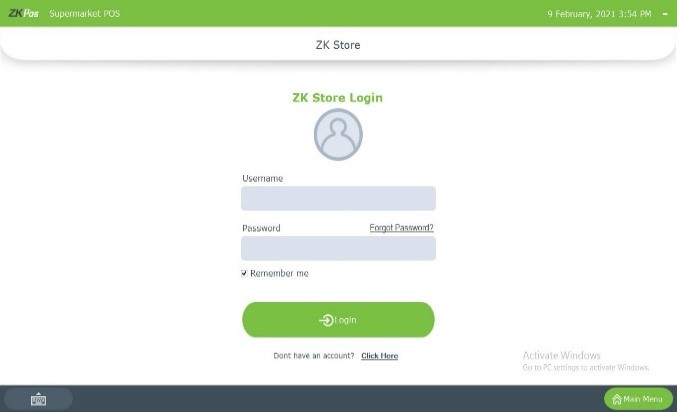
• You will get a login page
• If you are already created an account, enter the credentials and sign in
• Otherwise click Sign up now button
• Complete the registration and log in
• Open the executable file
• Enter the email and password you created at the time of member registration
• Select the software you want to download
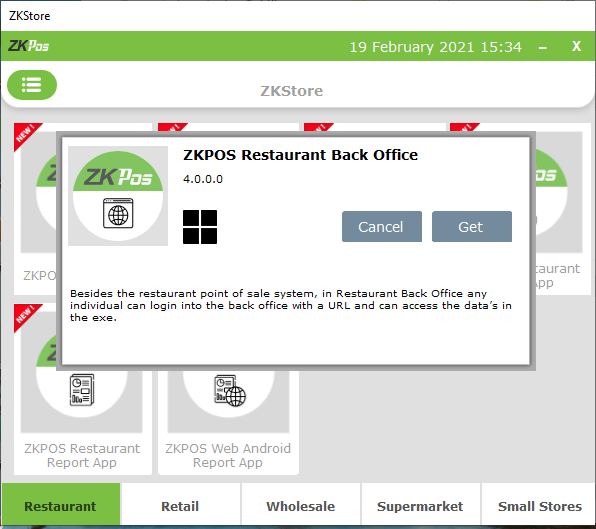
• Click Get button
• Browse the location and click OK
• Your download will be started.
-
How can I activate my ZKPOS licence?
Through ZK STORE
• Open the ZKPOS Software by clicking RUN AS ADMINISTARTOR
• Enter password and username
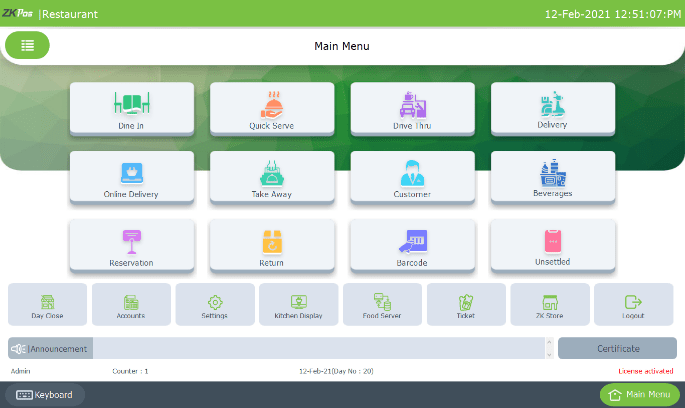
• Click on ZKSTORE button from dashboard
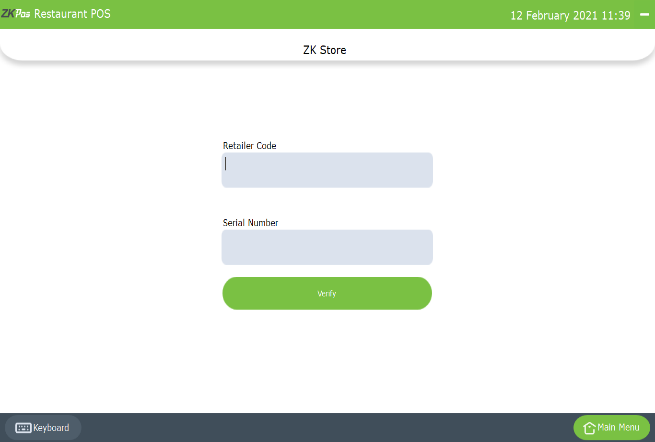
• Open ZKSTORE
• Enter the retailer code and serial number
• Click VERIFY button
• Click OK to the confirmation message
• Now your device is verified Successfully
• If you want to access ZKSTORE you need to login to registered account
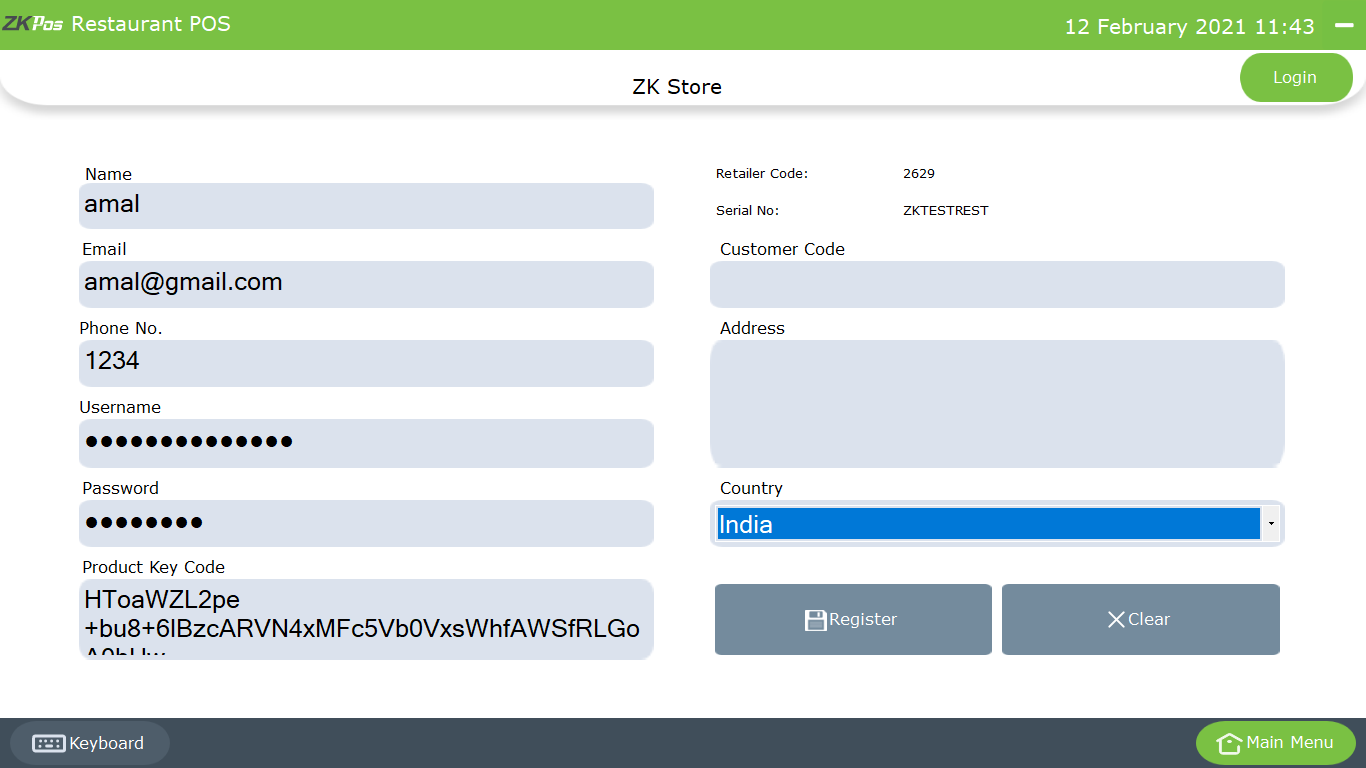
• If you don’t have one, then create one using REGISTER link
• Your product key code, retailer code and serial number already seen in registration form
• Fill other details and click REGISTER button
• After registration you will get one username and password, you can use it for login to ZK STORE.
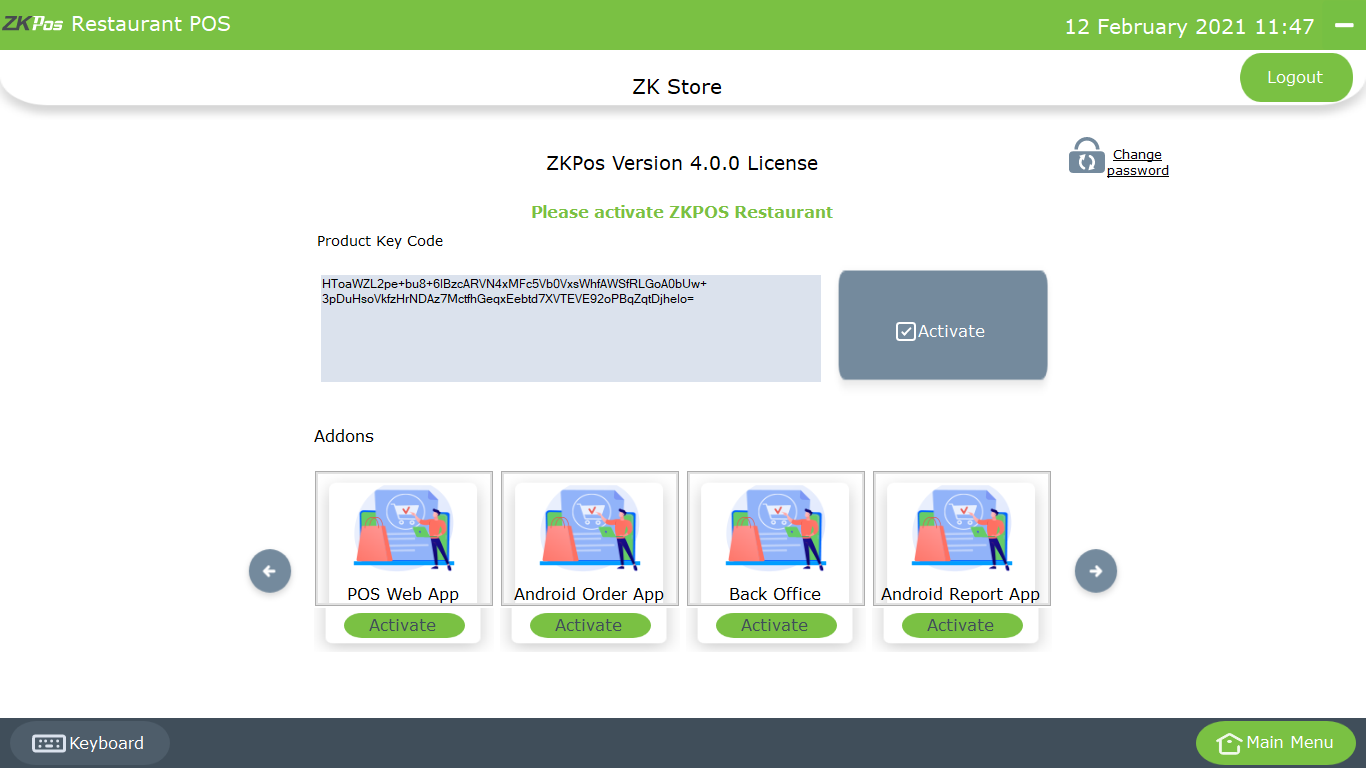
• To activate the license, click on ACTIVATE button
• You can activate the license after confirm the request by retailer.
• After confirmation activate button will be changes to INSTALL
• Log out from the ZKSTORE and again login to see the changes
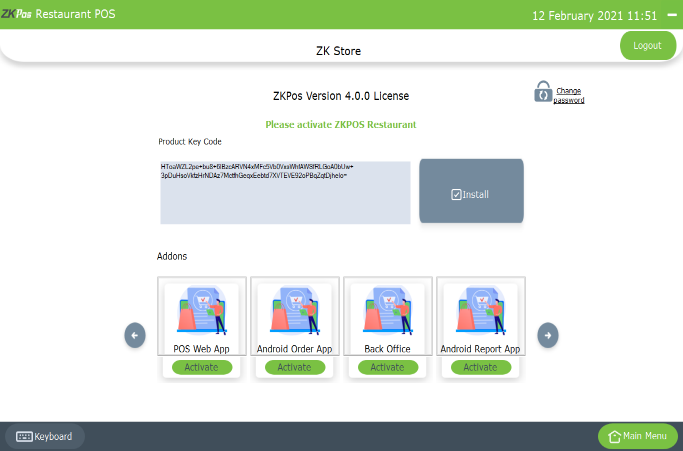
• Click on Install button
• You will get a pop up for restarting the application
• Restart the application
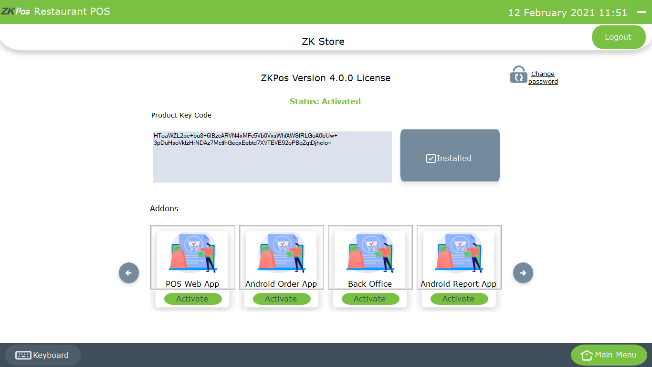
• Now the status will be changes to installed
• You are successfully activate the license
Through ZKPOS utility
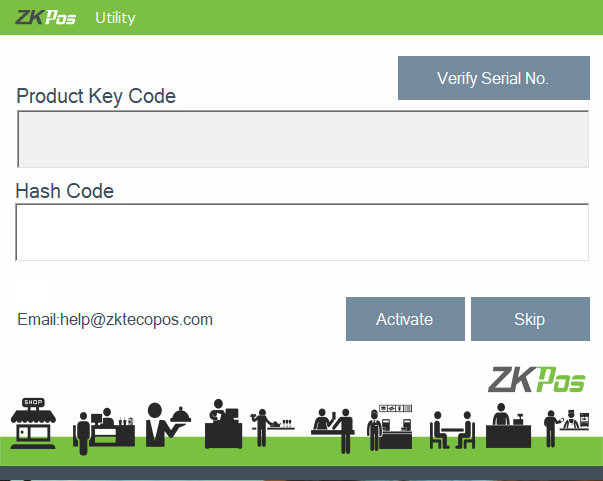
• Open Zkpos utility by clicking RUN AS ADMINISTRATOR
• Click on Verify Serial Number button
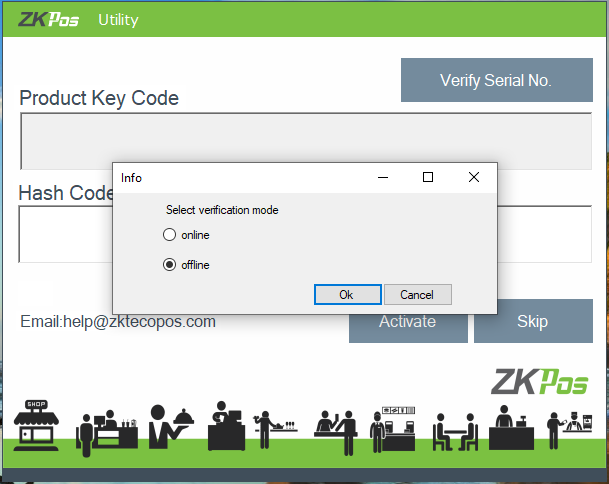
• You can have two verification modes – online and offline
• Select online verification method first
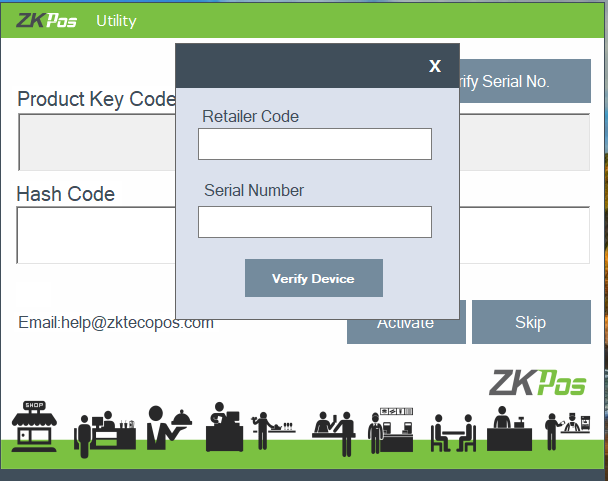
• Enter retailer code and serial number
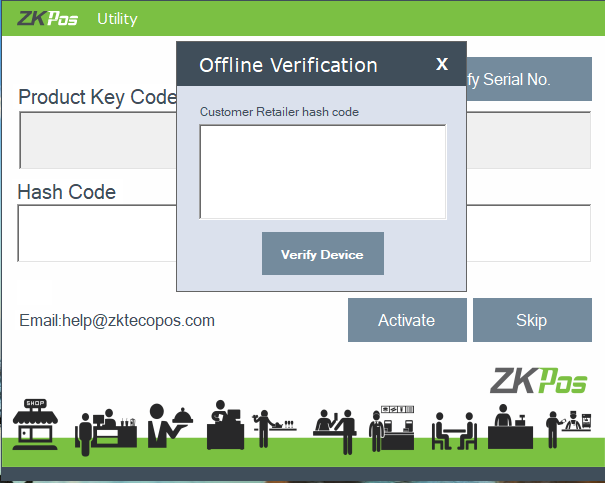
• For offline verification enter customer retailer hash code
• Contact you retailer for customer retailer hash code
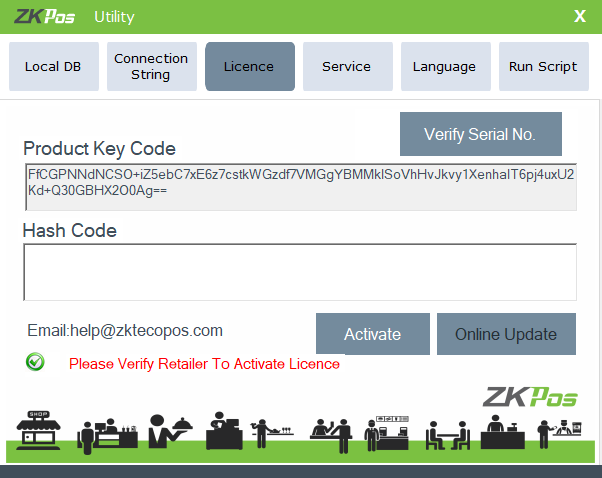
• After verifying the serial number you are provided with a hash code by the retailer
• Copy the hash code in the respective place
• Click Activate button
-
How can I add new fingerprint on user?
• Login into ZKPOS software using admin User Id and Pin
• Go to Settings>>User List
• Select the user from the list you want to add or select admin
• Click Fingerprint Registration button
• Select the user from drop down
• Click on register button and keep any finger three times for registering fingerprint.
• Click on verify button to verify the fingerprint.
• Click update to update the user details
• Now go to main menu>> click logout button, then try to login by keeping finger on the fingerprint device.
-
Did ZKPOS support multiple currencies in billing?
ZKPOS supports handling multiple currencies without any deviation in the monetary transaction records. All financial records are viewable both in base currency and in foreign currency.
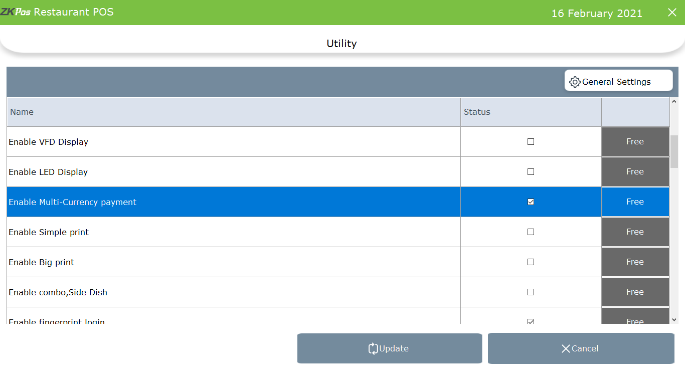
• Click on Settings>> Utility
• Enable the multi-currency payment feature from utility
• From settings select currency exchange rate
• Click on online update button
• Now while settling the amount, you can have an option to change the currency as your wish
-
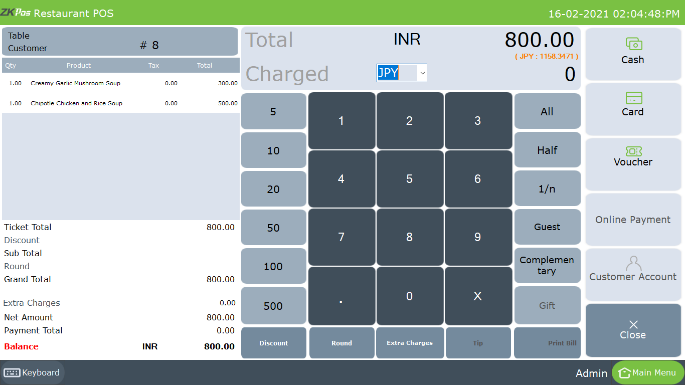
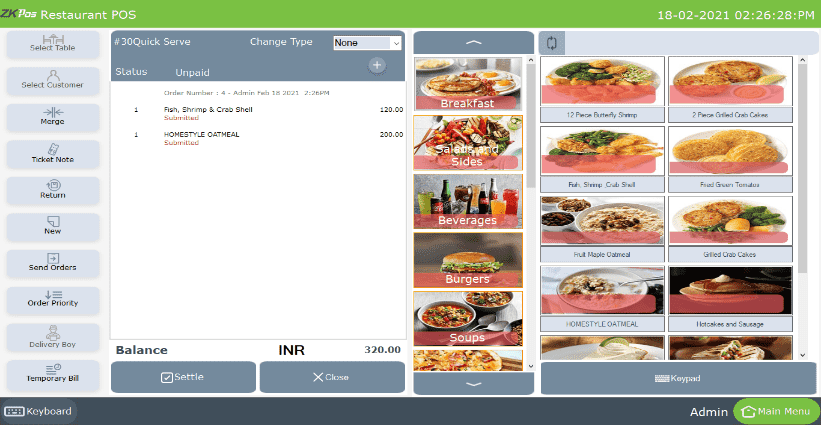
Can I split a payment on ZKPOS?
Yes, you can split payments into multiple payment methods, as well as offer partial payments if you’d like your customer to complete their payment at a later time.
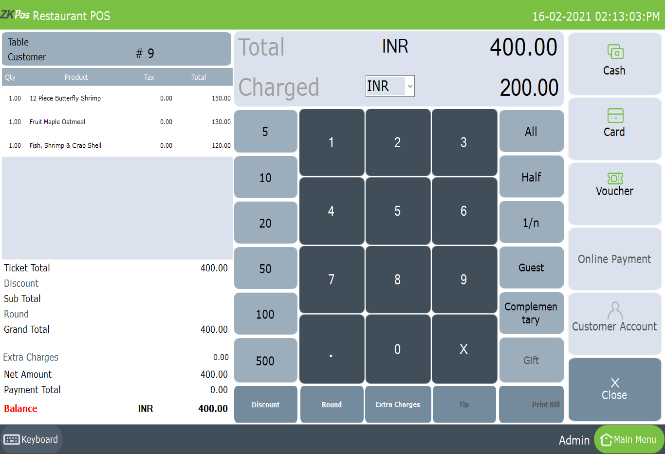
• In settlement page you have two options ALL or HALF
• If you decide to pay half amount as cash, click on the HALF button and then click on CASH
• Now you can pay the balance amount by clicking ALL button through available payment method as your wish
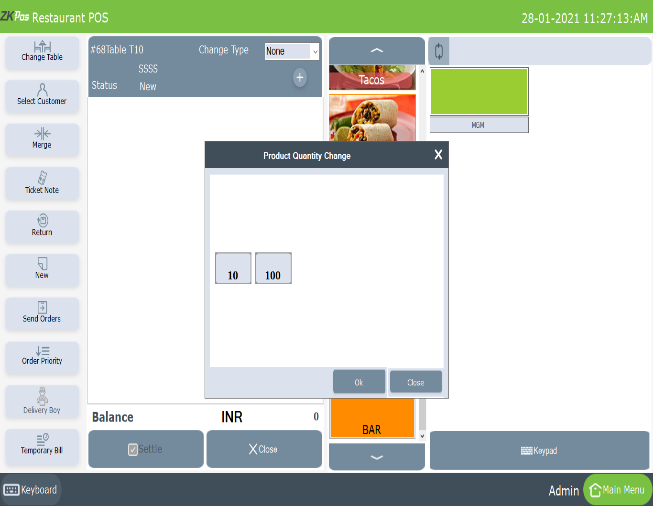
• You can also enter a particular amount by using the keypad as shown in the figure, and continue with clicking the payment method.
-
What are all the modules available in ZKPOS?
ZKPOS is complete Retail Management Solution that composes of Sales, Purchase, Inventory, Barcoding, Reports, Accounts, Warehouse, promotion, work period, ticket, food court and cash drawer.
-
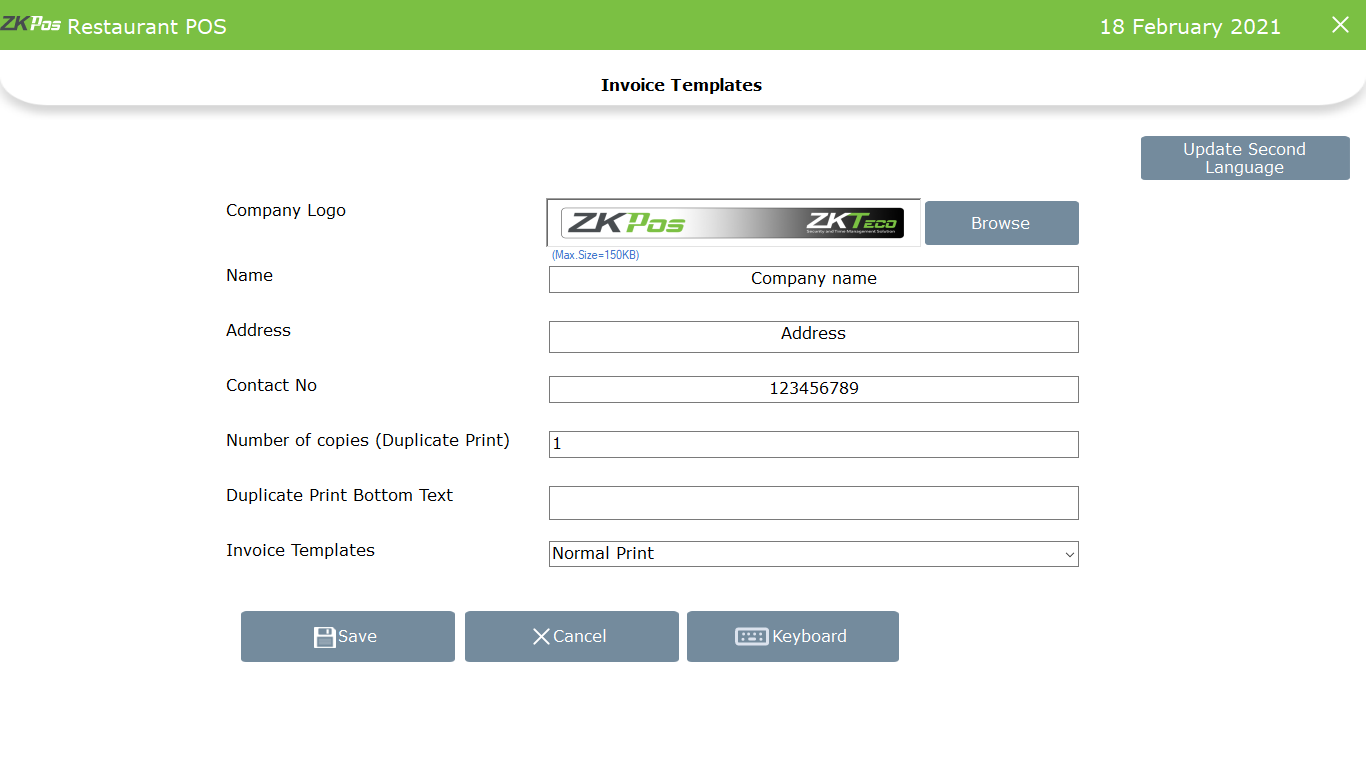
Do I have to change my bill design or are there any sales invoice/ bill print template available in ZKPOS Restaurant?
Whatever is your bill print requirements, pre-printed or check printing or custom designs. Using Template, you can edit any default print designs.
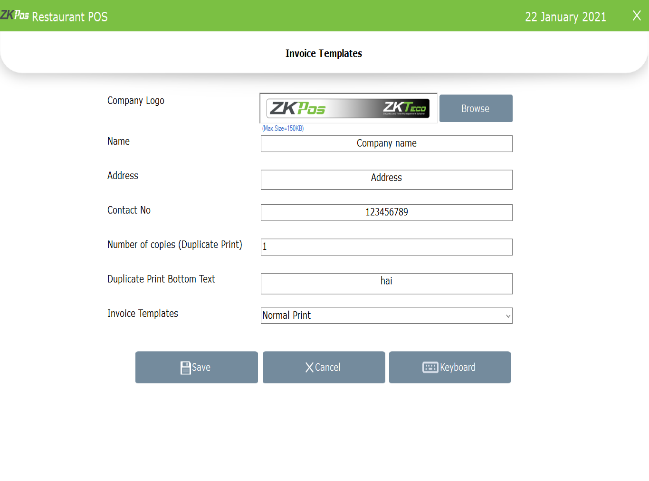
• Select SETTINGS from main menu
• Go to PRINTER section.
• Click INVOICE TEMPLATE.
• Enter the details in respective fields
• Select the invoice template print type
• Click SAVE.
You can also change the design in PRINT OPTION
• Go to PRINTER section.
• Click PRINT OPTION.
• Four print options are there; Receipt, Customer Order Print, Kitchen Order Print, Logo.
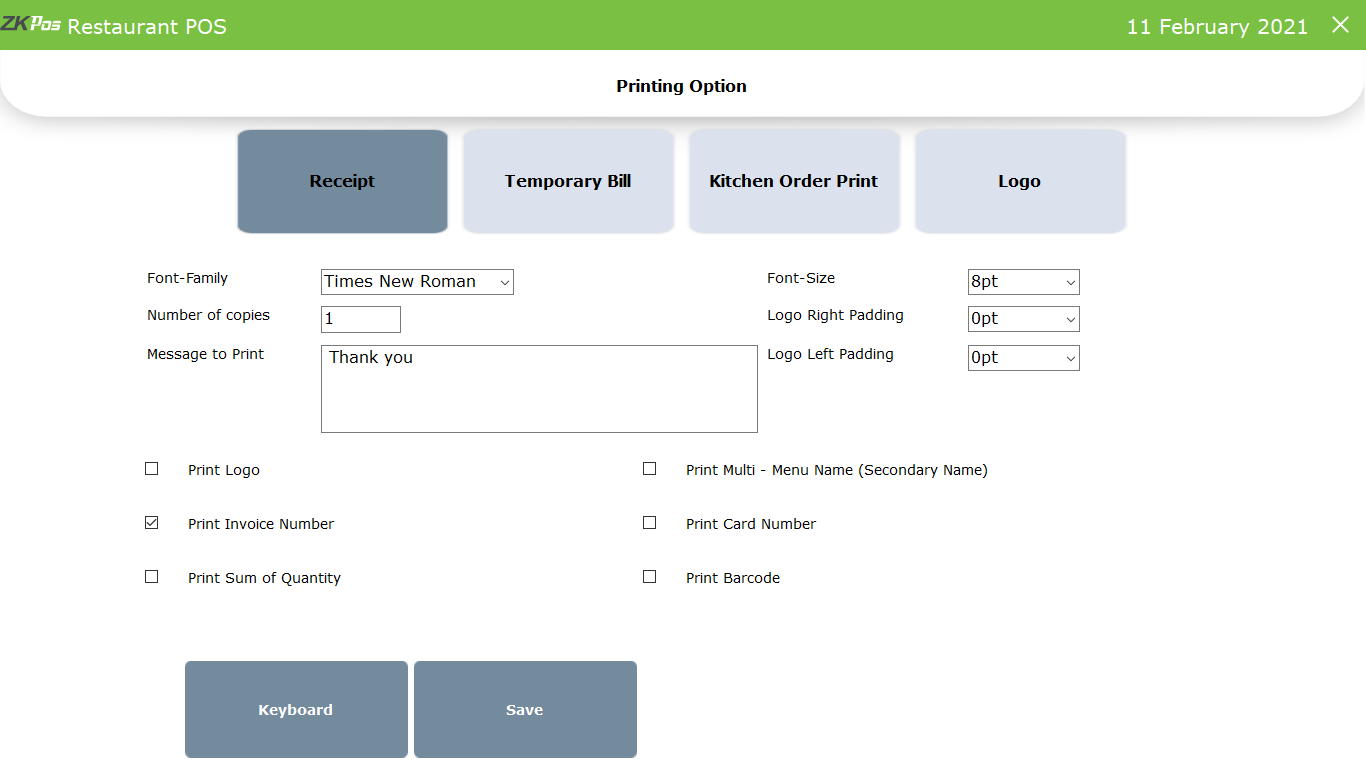
• In receipt option, you can select font family, font size, number of copies, message to print, padding width etc.
• You can select the options by tick the check boxes as shown in the figure
• Click SAVE button
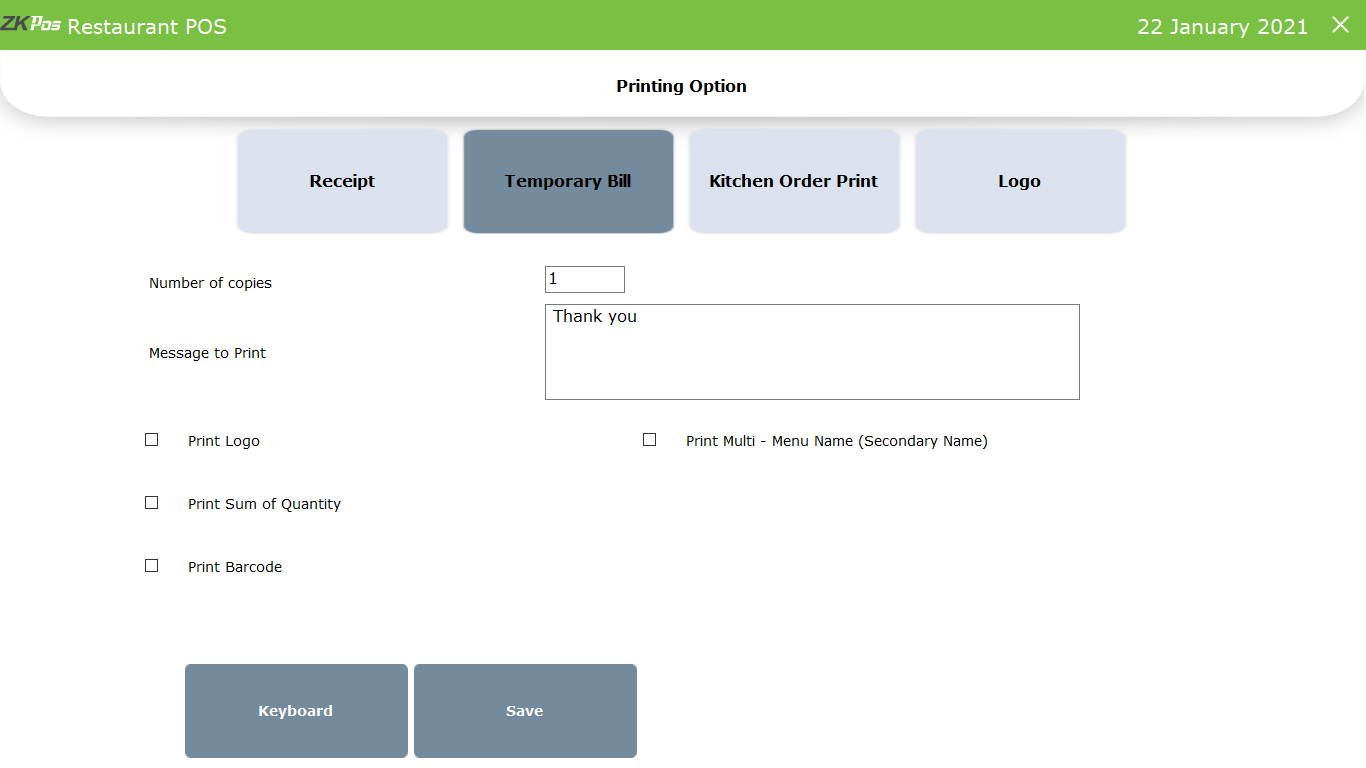
• Click temporary bill
• Enter number of copies, message to print and browse print log for temporary bill
• Select the contents like print logo, print sum of quantity, barcode and secondary name
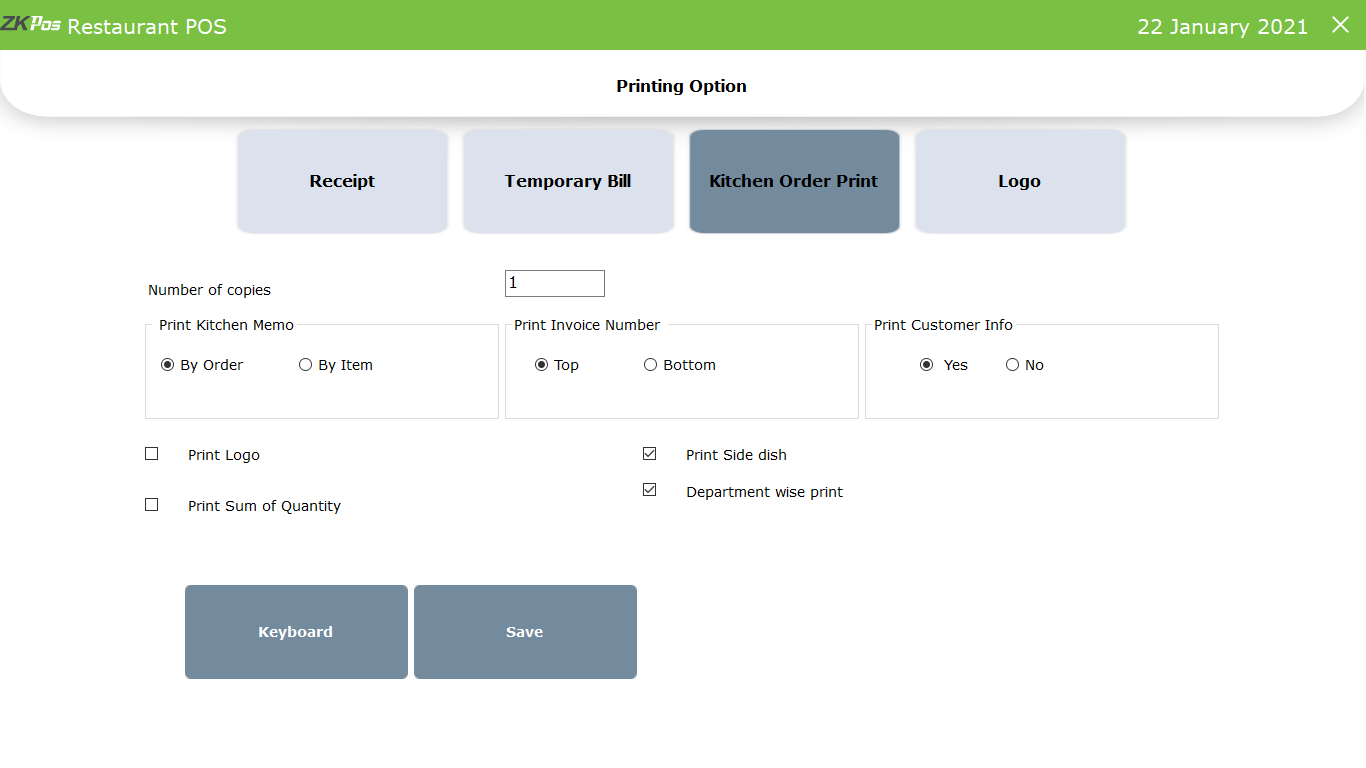
• Click kitchen order print
• Enter number of copies, kitchen memo by order or item, invoice number location, customer info
• Select the contents from details as shown in the figure
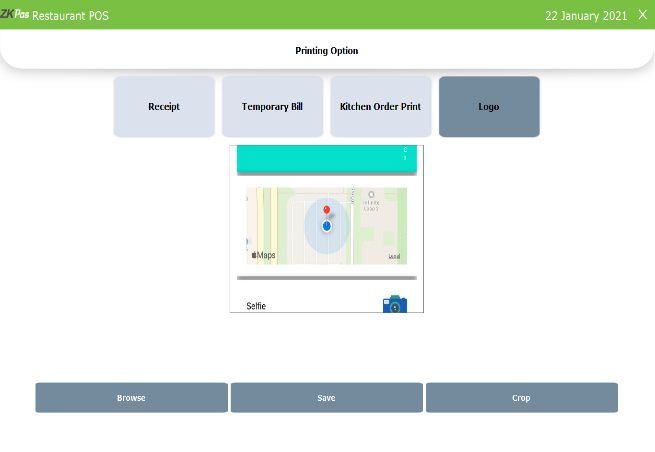
• Browse the logo and save
• You can crop the image by clicking CROP button
• After cropping the image click OK
-
How to add a new user in ZKPOS?
Other than admin you can add other users to ZKPOS. This will let other users to access ZKPOS. Other users can access only limited features that assigned to them. We can add 5 types of user privileges. Admin, Cashier, Food Server, Kitchen Manager and finally the custom role. Follow the below steps to learn about other user privileges. To create a NEW USER, follow the steps below.
• Click SETTINGS.
• Click USERS.
• Click on USER LIST menu on the top left of USER window.
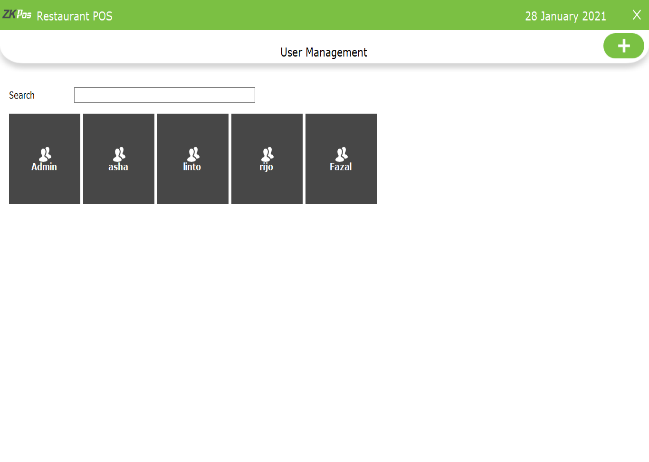
• ADMIN USER will be there by default. To view/edit Admin details click on ADMIN button.
• You can add new users by clicking on ADD (+) button
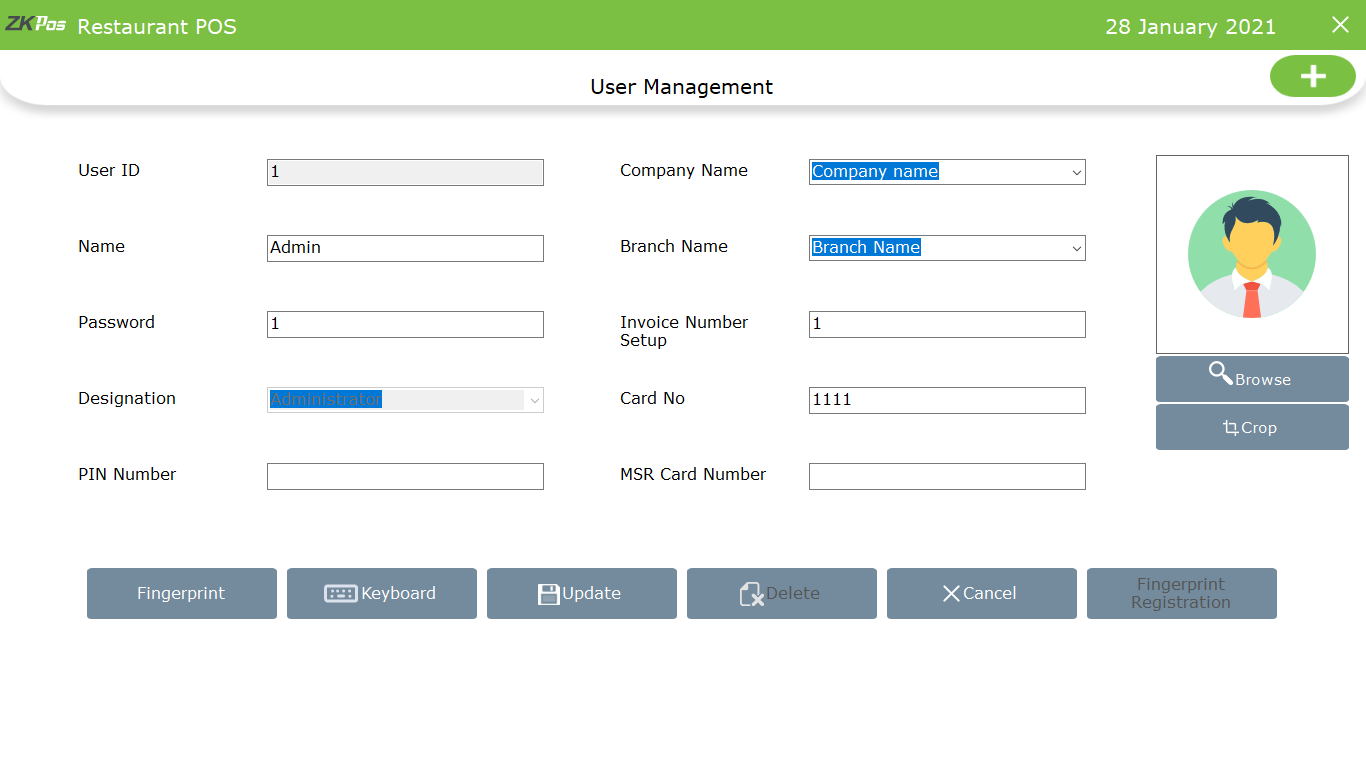
• USER ID, NAME, PASSWORD, COMPANY NAME, BRANCH NAME, INVOICE START NUMBER, CARD NUMBER, MSR CARD NUMBER etc. everything will be displayed. You can’t edit the designation of admin. Also you have an option to login using a PIN number, for that enter the pin number.
• After making necessary alterations click on OK button. You cannot delete admin.
• To add a new USER, click ADD button.
• In the new window you have to specify the User ID, Password and Designation of the user. Default User ID can change as you wish. Pin is optional that lets you to login using your pin number.
• Company details and invoice start number will display automatically. Add CARD NUMBER and MSR CARD NUMBER if necessary.
• You can add finger print login also
• You have to activate ‘ Enable finger print log in’ in utility
• Click finger print button
• Connect the device and registre your finger print
• There is two types of finger print registartion – one is registered by connecting an external device like SLK 20R and other is register the finger print by inbuilt device in POS machine
• To registre by using inbuilt finger print you have to enable ‘enable inbulit finger print registration’
• After adding all necessary details click UPDATE button.
-
What is day close in ZKPOS?
An accounting procedure undertaken at the end of the day to ensure that all business transactions from the current day have been correctly processed.
• You can see a DAY CLOSE button in the MAIN MENU. This option is only available to ADMIN.
• Click on DAY CLOSE.
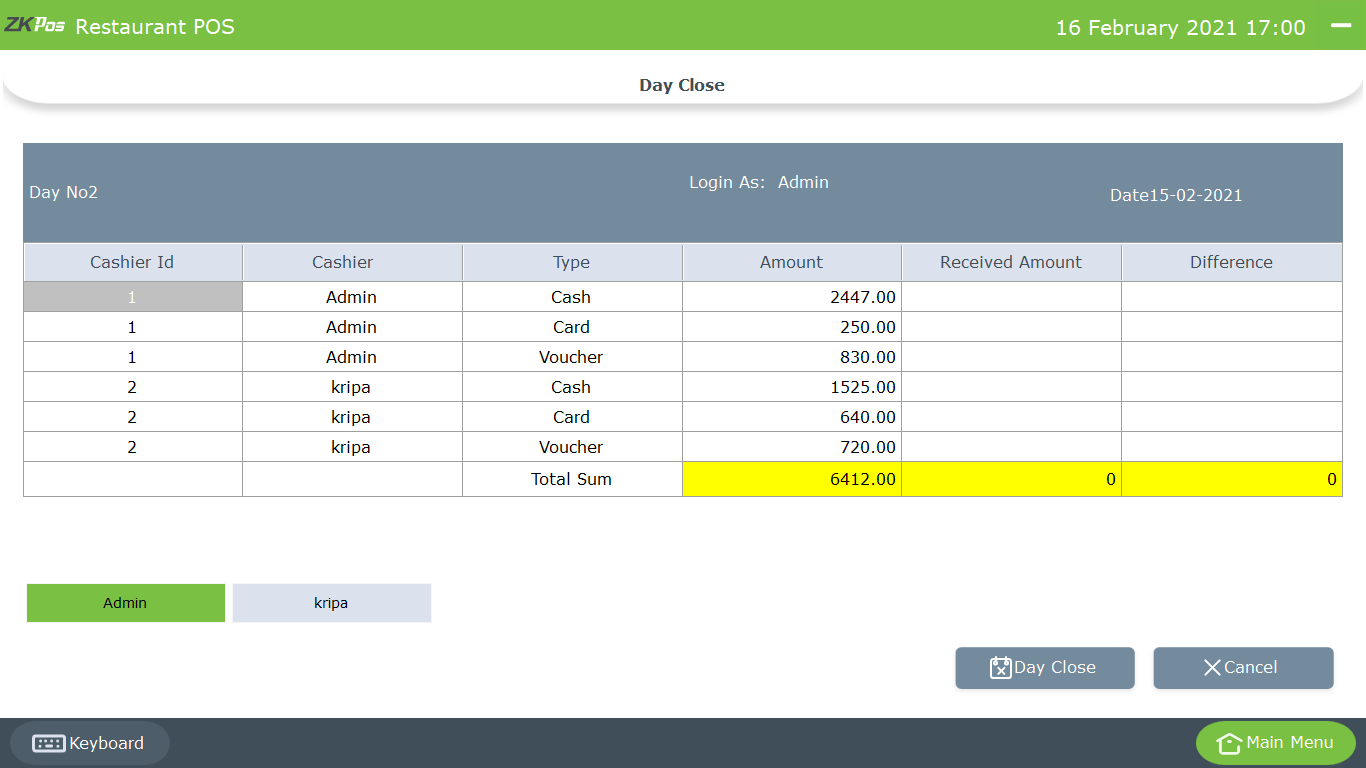
• You can see the INVOICE AMOUNT in the AMOUNT column. You need to enter the amount that you received from the customer in RECEIVED AMOUNT column.
• Now click on DAY CLOSE button.
• Confirm the day close by choosing YES. If there is any unprocessed bill another popup will show up and you need to confirm it too by clicking CONTINUE.
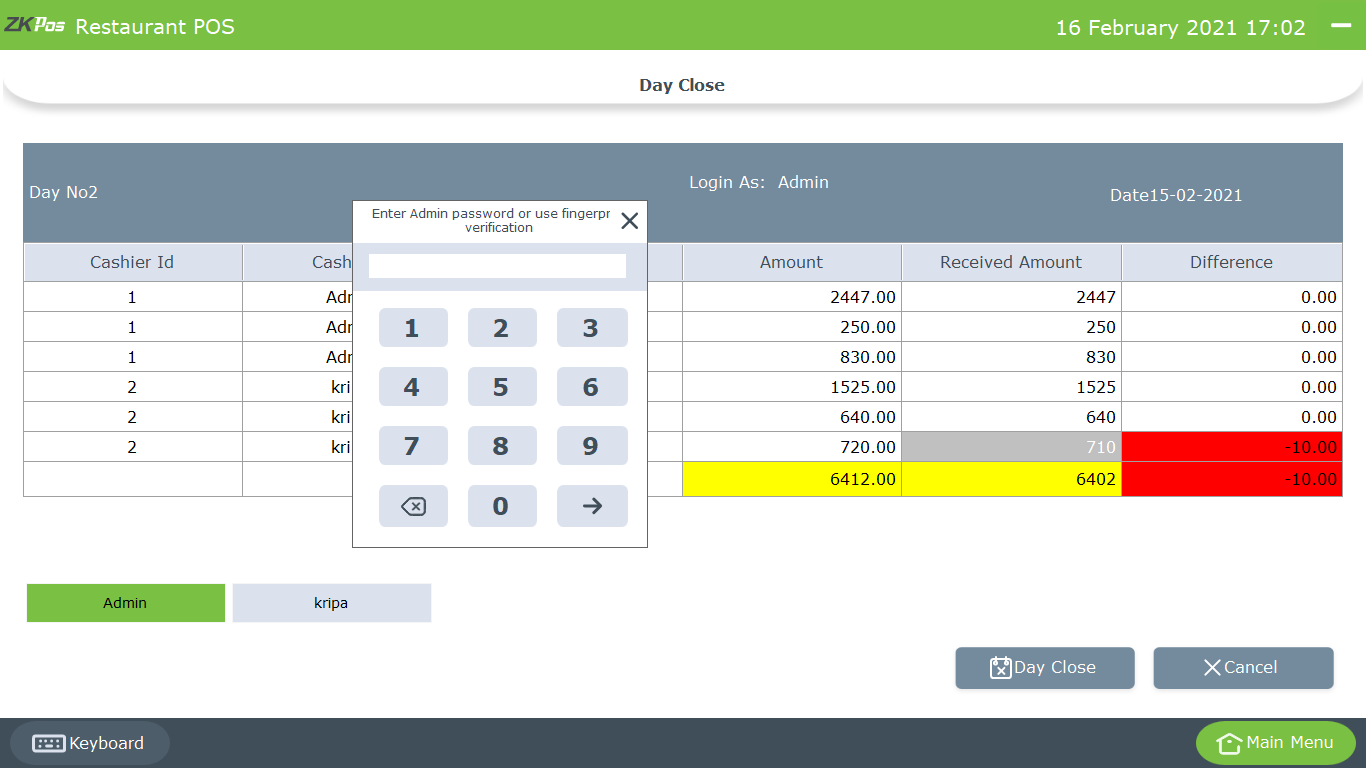
• To complete the process you need to enter the ADMIN PASSWORD.
-
How to configure ZKPOS Order App in ZKPOS Restaurant software?
• Start the installation by double click on the ZKPOS Restaurant app service
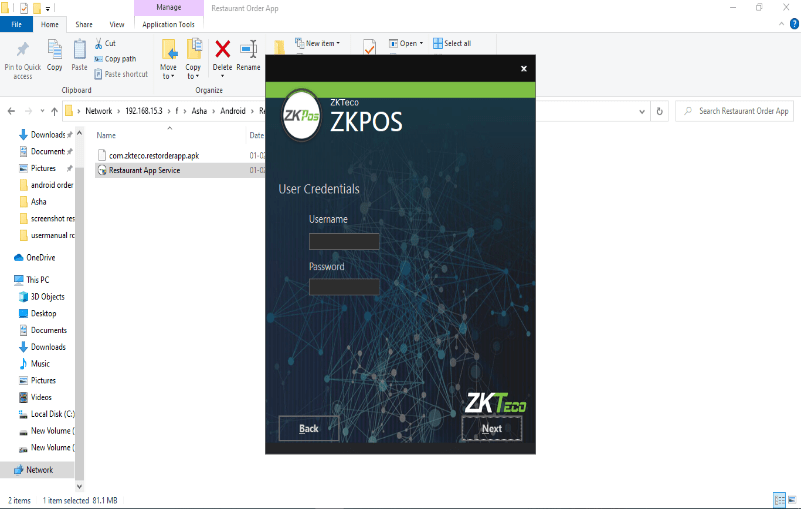
• Enter the username and password of the system where you installed the ZKPOS Restaurant App service
• Click NEXT button

• Agree the license terms to continue the installation.
• Click FINISH button to complete the installation
• Enable Internet Information Services (IIS) Manager
• Open Control Panel – Click Turn Windows features on or off, it will show the picture listed below
• After clicking the windows features turn on or off you has been seen a popup Window of windows Features.
• Activate HTTP Activation.
• Expand .NET Frame work 4.5 and above
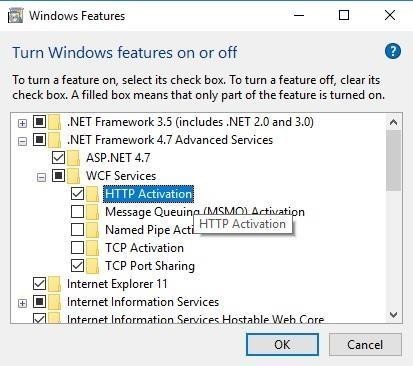
• Select Internet Information Services (IIS)
• Click OK
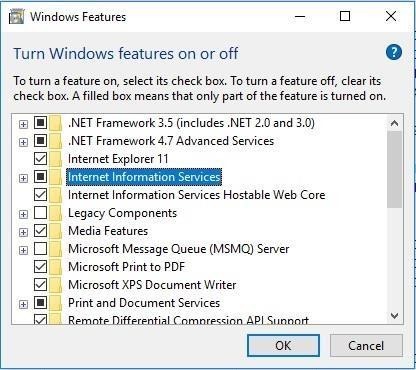
•After Internet Information Services (IIS) is enabled, please restart the system.
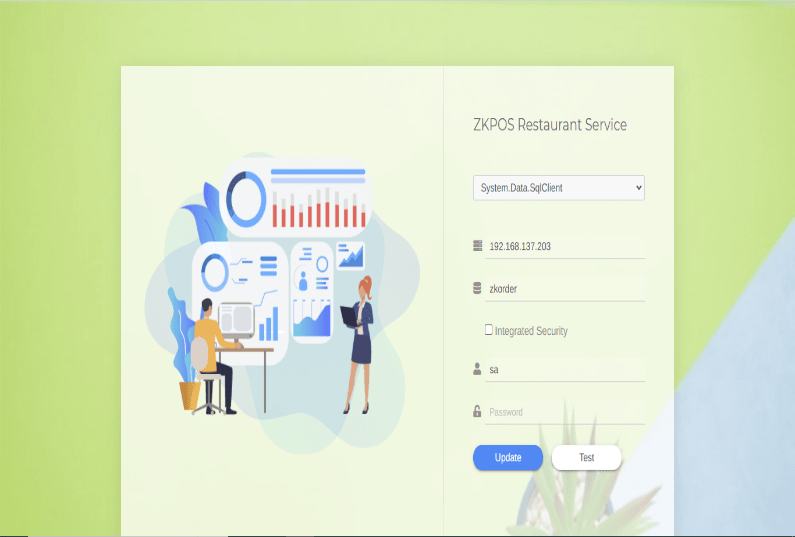
• Open the ZKPOS Restaurant service
• Select local db or system data sql client from the drop down
• If you select system data sql client, you can enter Database Server, Database Name, Username, and password.
• Click update and then test. A successful message will be shown under the test button.
• If you select local db server name and database name automatically appears there
-
How can I set currency rate in ZKPOS?
Some customers may feel happy if you could produce the invoice in their native currency rate, or there may be situations where you need to deal with foreign customers. So you could know the exchange rates easily with this functionality. It is possible by updating the EXCHANGE RATE.
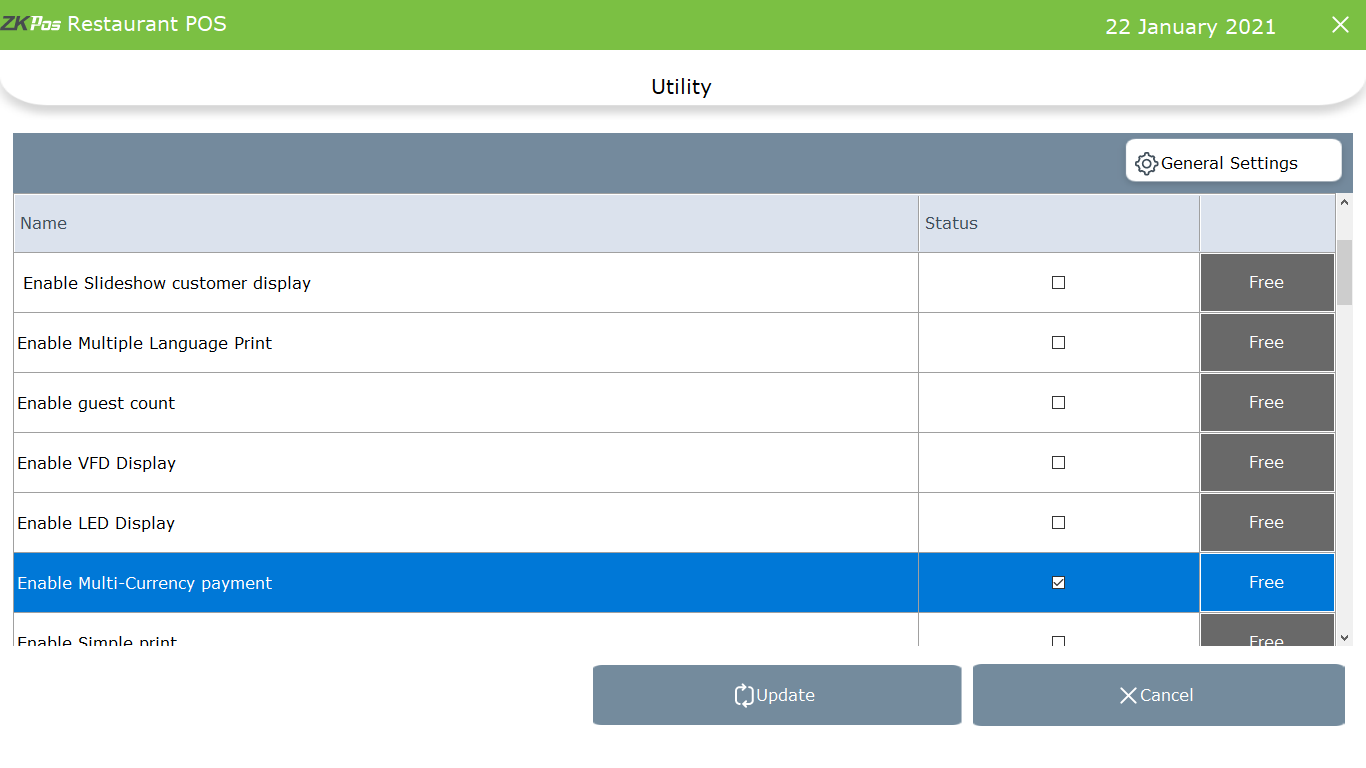
• First you should enable MULTY-CURRENCY PAYMENT in the UTILITY.
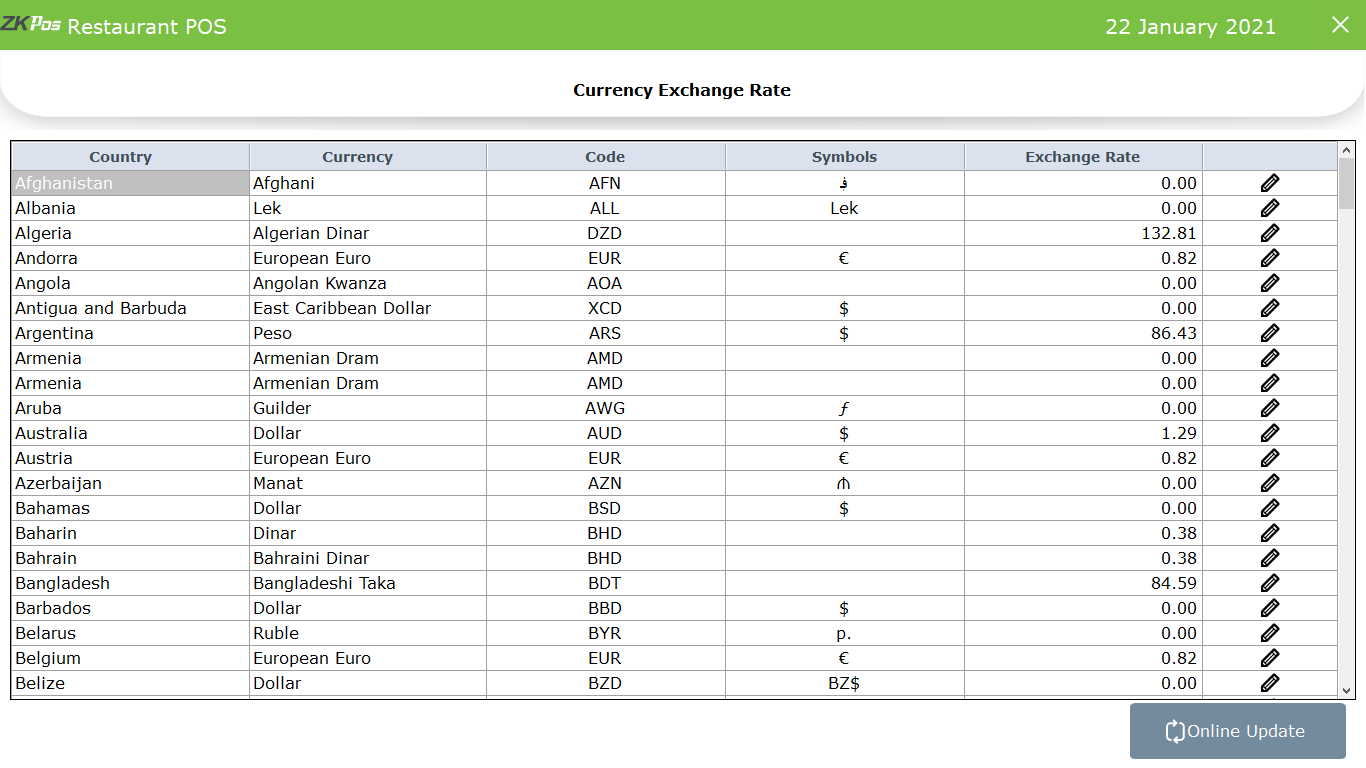
• Now, Go to SETTINGS.
• Expand Settings.
• From the menu options, click EXCHANGE RATE.
• Exchange rates may vary each day, so you can update it. Update it by clicking on ONLINE UPDATE button.
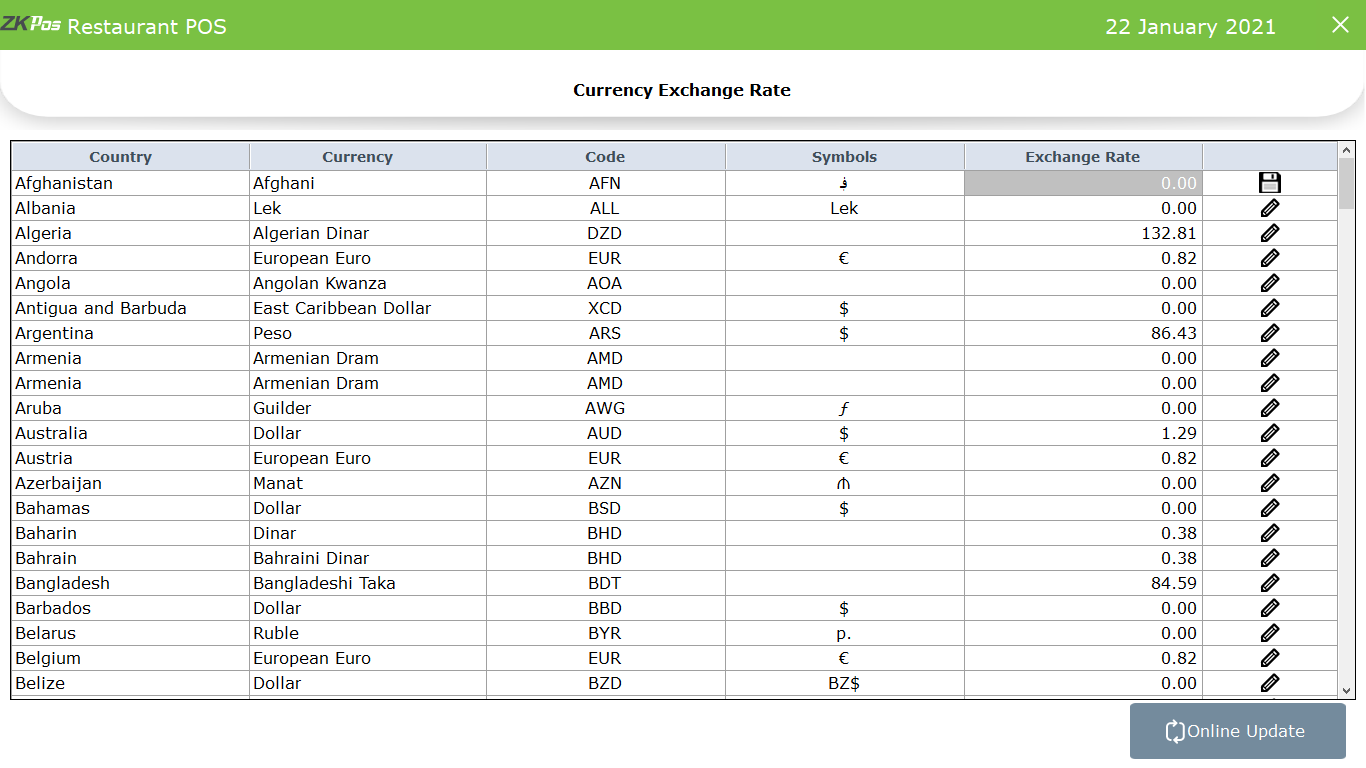
• You can change the exchange rate manually by clicking the edit (pencil like) button
• Enter the rate
• Edit button automatically changed to save button , so click on it to save
-
How to work Import table concept in ZKPOS?
In some scenarios you may need some data outside ZKPOS, in such cases you can import that data to your ZKPOS application.
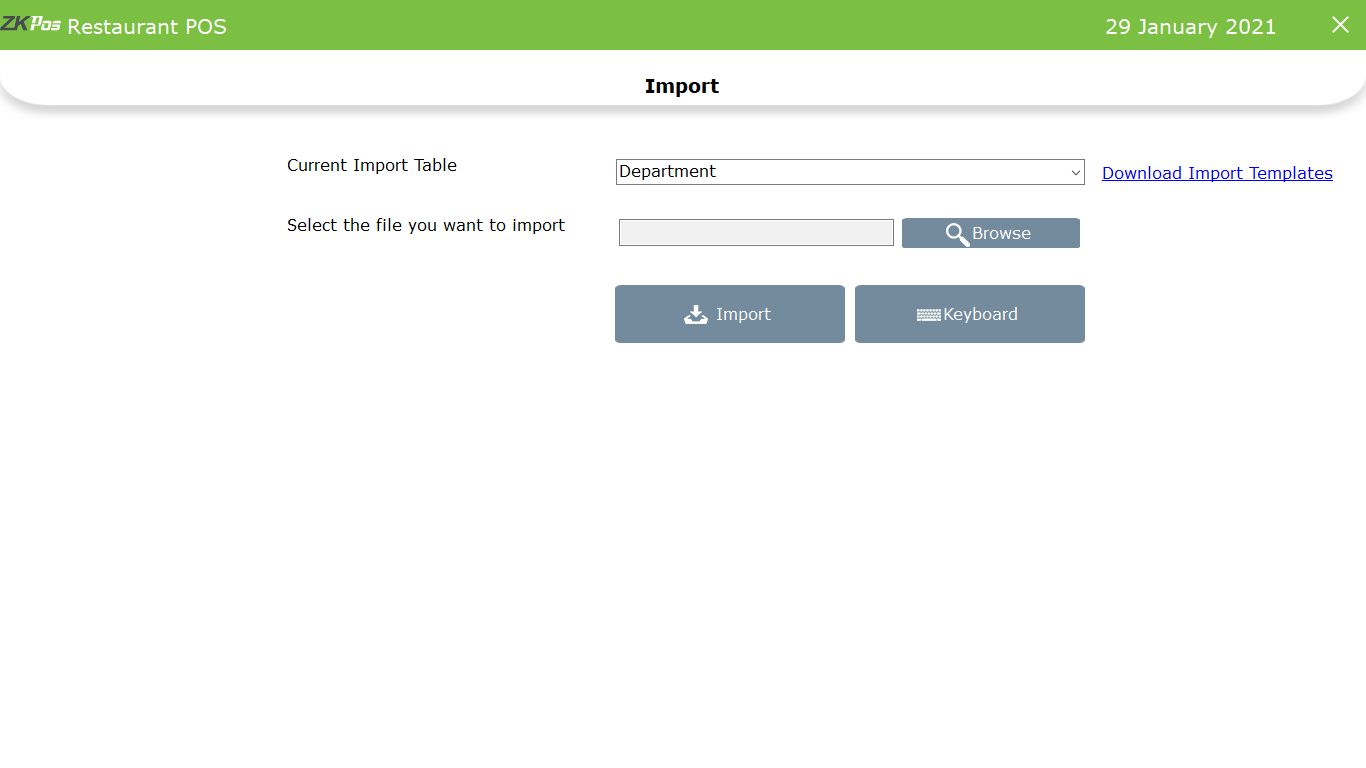
• Go to SETTINGS.
• Click on database.
• Click on IMPORT TABLES.
• Select the Database Table to which the data to be added.
• Now browse the folder for the required data.
• Click on IMPORT button.
• Click OK.
• You can download the import template by clicking on ‘Download import template’ button
-
How to work Export table concept in ZKPOS?
You can export data from ZKPOS to your computer.
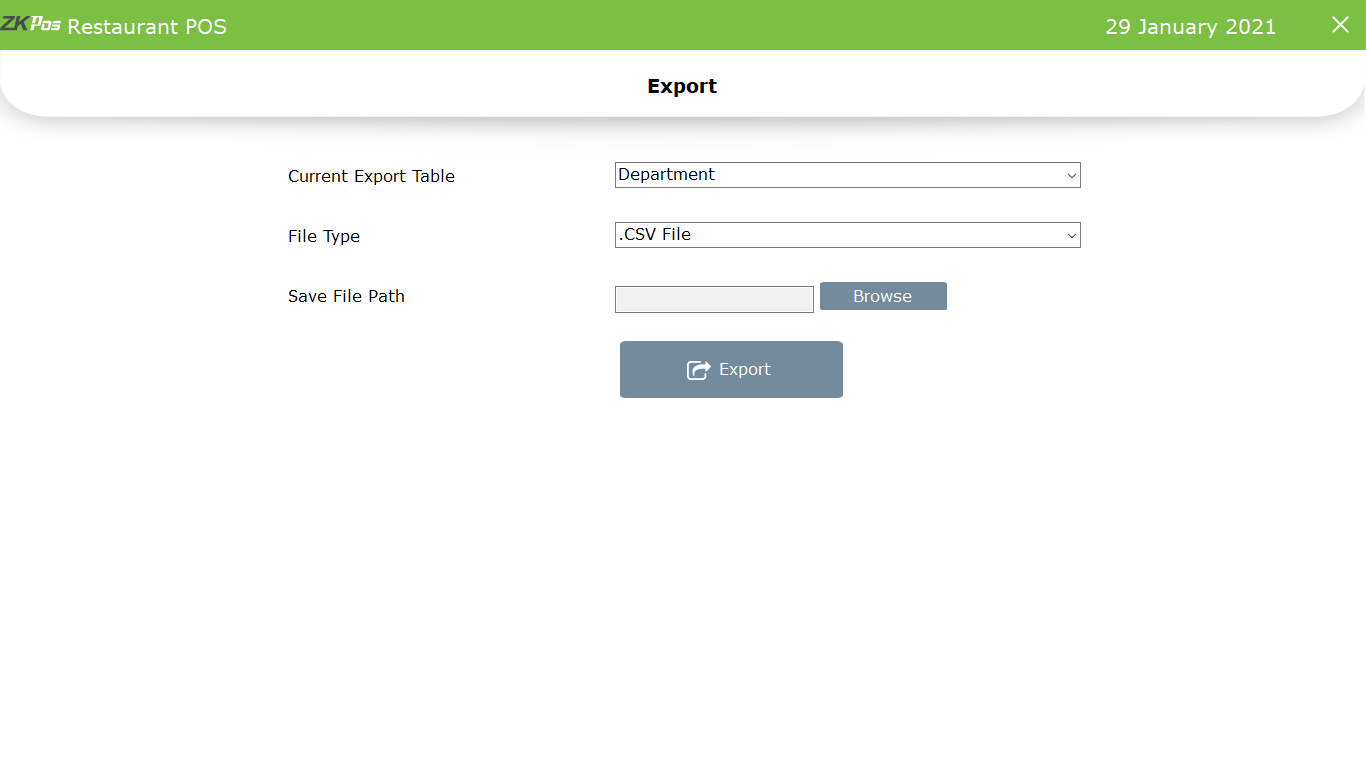
• Go to SETTINGS.
• Click on database.
• Click on EXPORT TABLES.
• Select database table and path.
• Click EXPORT button.
• Click OK.
-
How can you use ZKPOS Restaurant Software in beverages/bar?
There is a separate quantity master and price master for beverage section. Please note that you have to create a department by activating the bar facility and create products by selecting the unit millilitre.
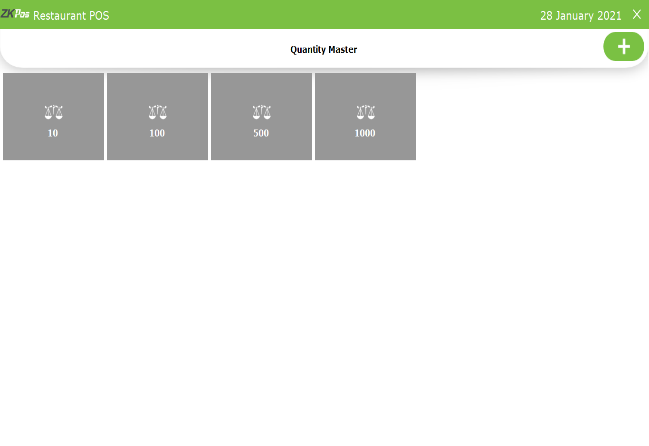
• Click on QUANTITY MASTER Menu from PRODUCTS.
• Click ADD button.

• Enter quantity.
• Click SAVE button.
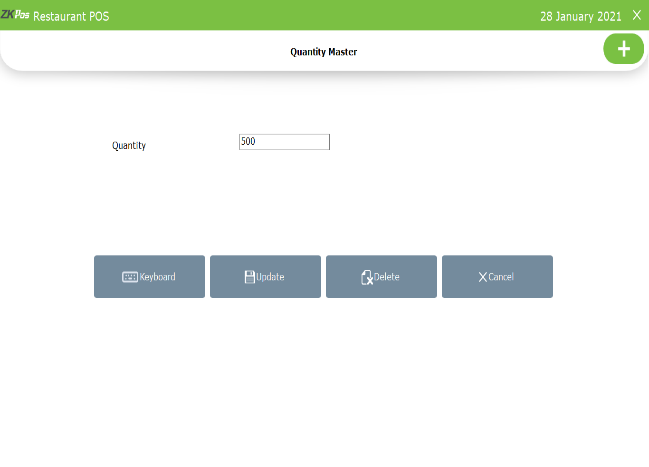
• To change details the, click Update button. To delete details the, click Delete button.
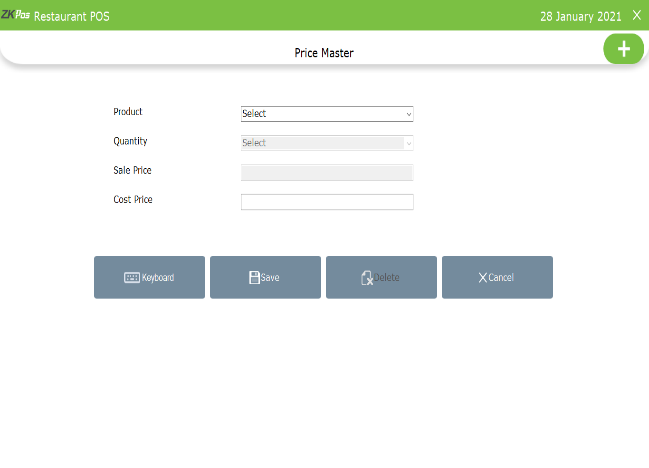
• Click on PRICE MASTER menu from Products.
• Click ADD button.
• Choose product (must be included in department bar).
• Enter the cost price.
• Sale price already shown according to the product price.
• Click Save.
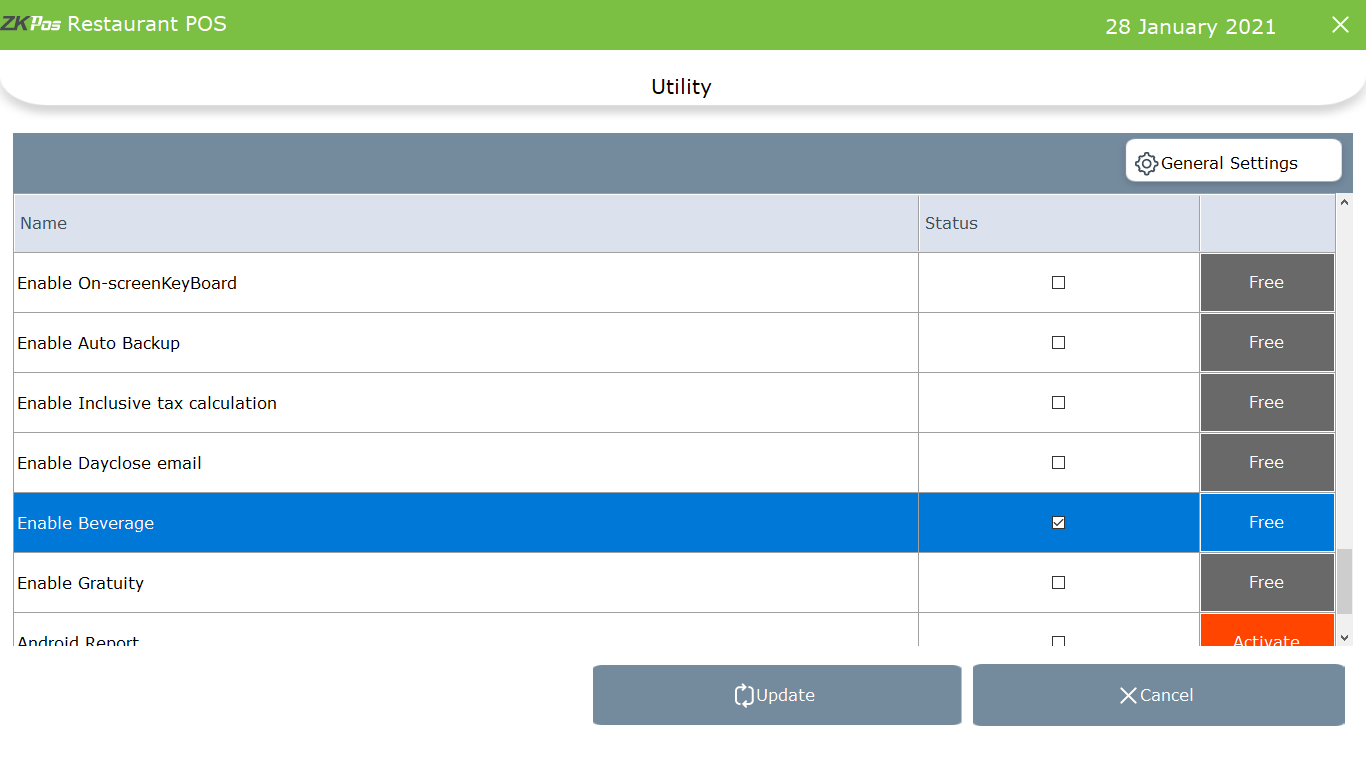
• Enable beverages from UTILITY
• Click UPDATE button
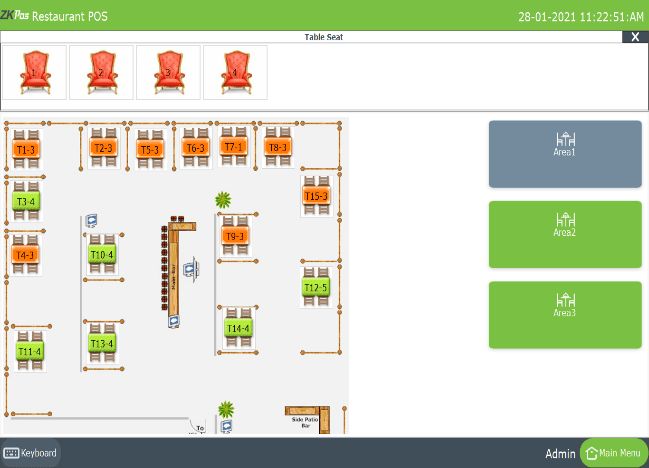
• Click Beverages in main menu.

• Select Table and Table seat.
• Select Items from the list.
• You will get a pop up to select the product quantity as we saved in beverages masters
• Select the quantity from pop up
• Click settle button to continue.
-
What you mean by a retailer? How do you I get to know ZKPOS retailers near your premises?
A person that sells ZKPOS hardware and software to the public in relatively small quantity for use or consumption rather than sale. To know about your retailer details contact help@zktecopos.com
-
How to print secondary language in invoice in ZKPOS Restaurant?
You can print secondary language too in your invoices. For that update your secondary language first.
• Go to Settings>> printer>> Invoice Templates
• Click on Update second language option
• Click on Update second language option
• Update the language and click update button.

• Go to Settings>> Printer >> print option
• In receipt tab, click on the check box ‘print multi menu/secondary name’
-
How to change the language in ZKPOS Software?
For changing the software language
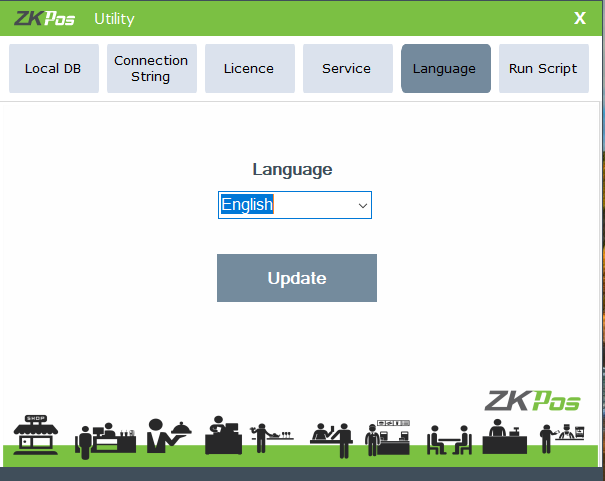
• Open ZKPOS utility by clicking Run as administrator
• Click on the language tab
• Select the language from drop down
• Click Update
-
How to change the Software type in ZKPOS Restaurant?
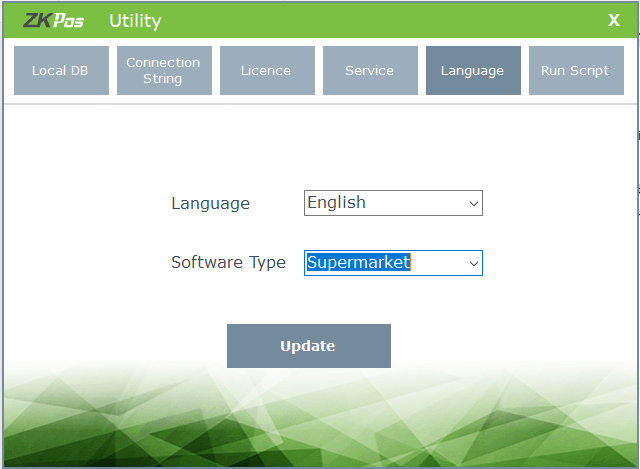
• Open ZKPOS utility by clicking Run as administrator
• Click on the language tab
• Select the software from drop down
• You can change software type to retail, wholesale and supermarket according to your wish.
• Click Update
Hardware
-
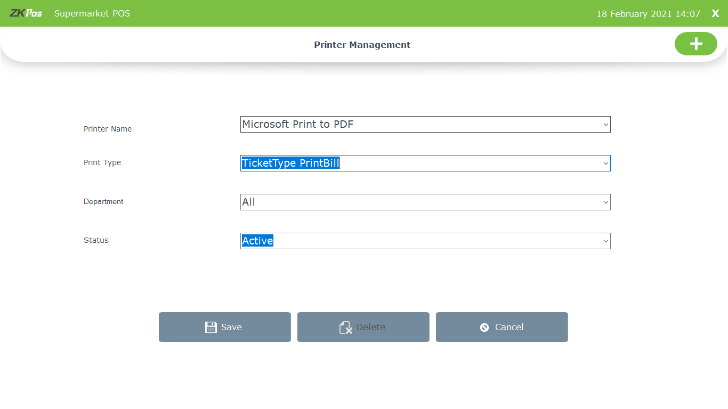
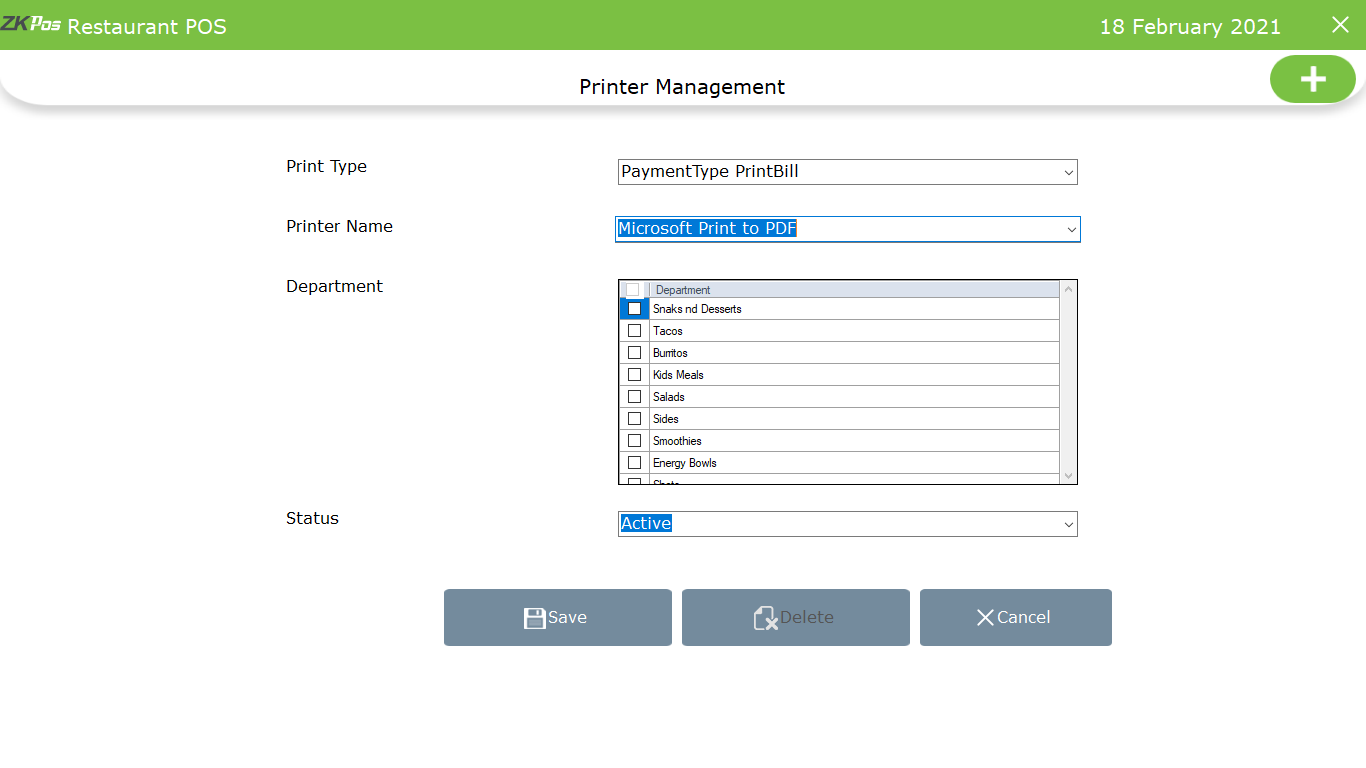
How can add a new printer in ZKPOS?
• Main Menu >> Settings >> Peripheral Device >> Printer Management
• Select exact system printer name, printer type from dropdown box
• Select department from dropdown box in case you select ticket type printer
• Select status as active or not active.
-
How can I Edit and Update Printer in ZKPOS

• Then click on save button.
• Click OK to the success button
• Select or Click respective printer from the printer management.
• The selected printer details shows then and the admin can make changes.
• After modification click on Update button.
• A confirm message “Printer Updated Successfully”.
-
How to do a Printer configuration in Windows ?
a) To install a printer
In most cases, all you have to do to set up a printer is to connect it to your PC. Simply plug the USB cable from your printer into an available USB port on your PC, and turn the printer on.
• Swipe in from the right edge of the screen, tap Settings, and then tap Change PC settings. (If you're using a mouse, point to the lower-right corner of the screen, move the mouse pointer up, click Settings, and then click Change PC settings.)
• Tap or click PC and devices, and then tap or click Devices. If your printer is installed, it should appear under Printers.
• If your printer isn’t listed, tap or click add a device, and then select your printer to install it.
b) To install (add) a local printer
• Click the Start button, and then,
• On the Start menu, click Devices and Printers
• Click Add a printer.
• In the Add Printer wizard, click Add a local printer.
• On the Choose a printer port page, make sure that the Use an existing port button and the recommended printer port are selected, and then click next.
• On the Install the printer driver page, select the printer manufacturer and model, and then click next.
• If your printer isn't listed, click Windows Update, and then wait while Windows checks for additional drivers.
• If none are available and you have the installation CD, click Have Disk, and then browse to the folder where the printer driver is located. (For additional help, consult the printer manual.) Complete the additional steps in the wizard, and then click Finish
c) To install a network, wireless, or Bluetooth printer
If you're trying to add a network printer at the office, you'll usually need the name of the printer. If you can't find it, contact your network administrator.
• Click the Start button, and then, on the Start menu, click Devices and Printers.
• Click Add a printer, in the Add Printer wizard, click Add a network, wireless or Bluetooth printer.
• In the list of available printers, select the one you want to use, and then click Next. (If your computer is connected to a network, only printers listed in Active Directory for your domain are displayed in the list.)
• If prompted, install the printer driver on your computer by clicking Install driver. Administrator permission required
• If you're prompted for an administrator password or confirmation, type the password or provide confirmation Complete the additional steps in the wizard, and then click Finish.
Tip: You can print a test page to make sure the printer is working correctly. If you've installed the printer but it doesn't work, check the manufacturer's website for troubleshooting information or driver updates.
-
How can I Troubleshoot printer problems manually?
a) Start by checking your hardware.
Make sure that the printer's electrical cord is plugged into an electrical outlet and that the power switch is turned on. If you're printing to a shared printer or a printer on a network, make sure that all necessary computers and routers are turned on too. If your printer or other equipment is plugged in to a surge protector or a backup power supply, make sure that hardware is plugged in and turned on as well. If you’re using a wired printer, make sure that the printer cable is properly connected from the printer to your PC. For wireless printers, check the wireless connection. Make sure the printer’s wireless option is turned on and available. Many printers have a button that displays a blue wireless icon when wireless is available. Next, run the printer’s wireless connectivity test. Read the instructions that came with the printer or check the printer manufacturer’s website for instructions about how to do this.
b) Use a trouble shooter
A trouble shooter is an automated tool that can find and automatically fix some problems with your PC. The printing trouble shooter can fix problems with installing and connecting to a printer.
c) Update drivers
Most printers require driver software to work properly. If you recently upgraded from one version of Windows to another, it's possible that the current printer driver is for the previous version of Windows. If you've had recent power outages, viruses, or other computer problems, it's possible that the drivers have become damaged. Downloading and installing the latest driver for your printer can resolve these types of problems.
d) Three ways to find and install a driver
Use Windows Update. Windows Update might have an updated version of your printer driver. Install software from the printer manufacturer. If your printer came with a disc, that disc might contain software that installs a driver for the printer. Download and install the driver yourself. You can search for a driver on the manufacturer's website. Try this if Windows Update can't find a driver for your printer, and the printer didn't come with software that installs a driver.
-
How to customize Customer Display ?
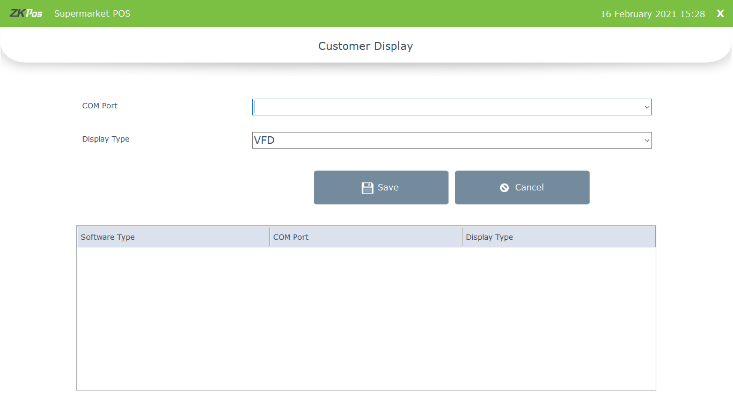
Main Menu >> Settings >> Peripheral Device >> Customer Display
To specify customer display port Select VFD or LED from the dropdown menu Save the settings
-
How to customize Secondary Display?
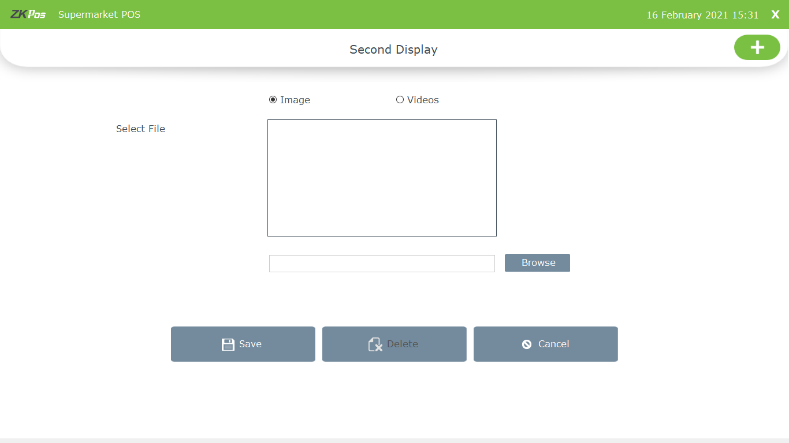
Main Menu >> Settings >> Peripheral Device >> second display
In this admin can add images and videos based on a company products, offers, discount, and it will displayed in the second display of a POS machine
-
How to set up different print types in ZKPOS Supermarket?
1) Ticket type print bill
Ticket type print bill is used to print the kitchen order ticket.
• From main menu, go to settings>> peripheral devices >> printer
• To add a new printer, click on add (+) button
• Select the printer name from the drop down
• Select the print bill as ticket type print bill
• Select the department or select all
• Enter status and click SAVE button
• Activate kitchen print and order print feature from utility.
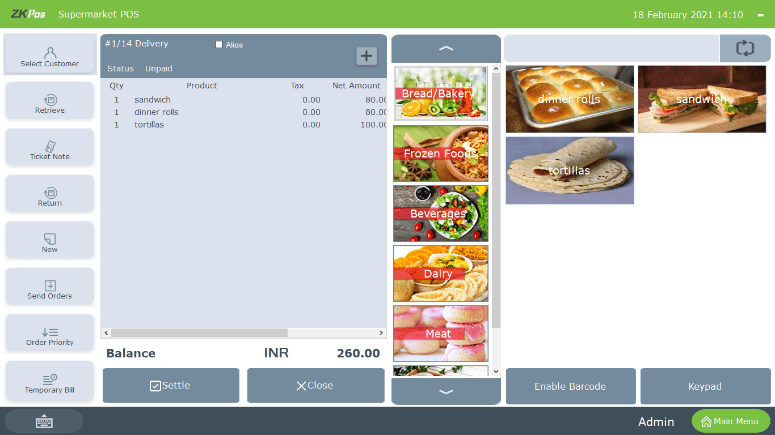
• Now go to POS section
• Select the products
• Click send order
• You will get the print out from the selected product.
2) Payment type print bill
Payment type print bill is used to print the invoices, duplicate invoices and temporary bill
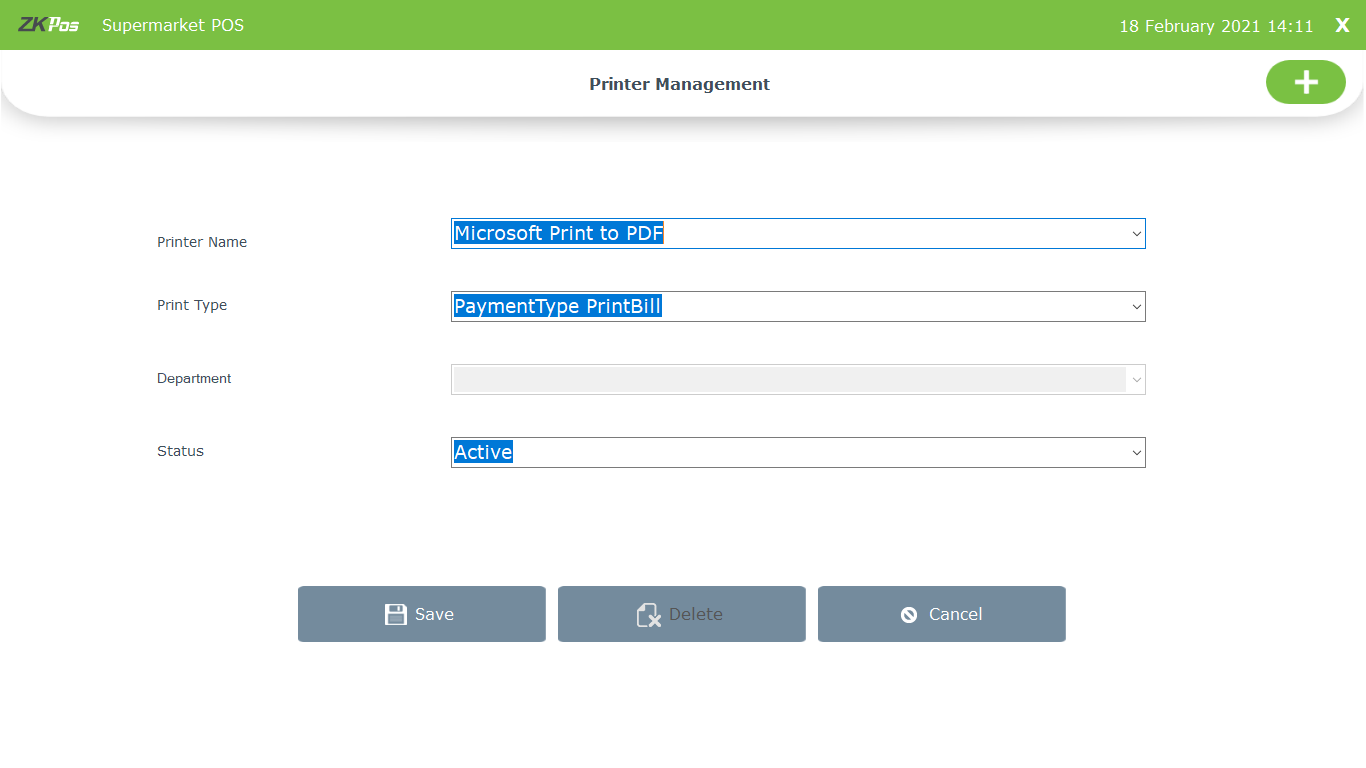
• Set payment type print bill by selecting the printer name
• Department field is automatically inactive if you select payment type print bill
• Select the status and click SAVE button
3) Normal type print bill
Normal type print bill is used to print all reports in software, customer account details and vendor account details, stock receiving, stock transfer, and purchase order

• Set normal type print bill by selecting the printer name
• Department field is automatically inactive if you select normal type print bill
• Select the status and click SAVE button
4) Payment type print bill A4
Using this print type we can take A4 print outs of invoices and duplicate invoices.
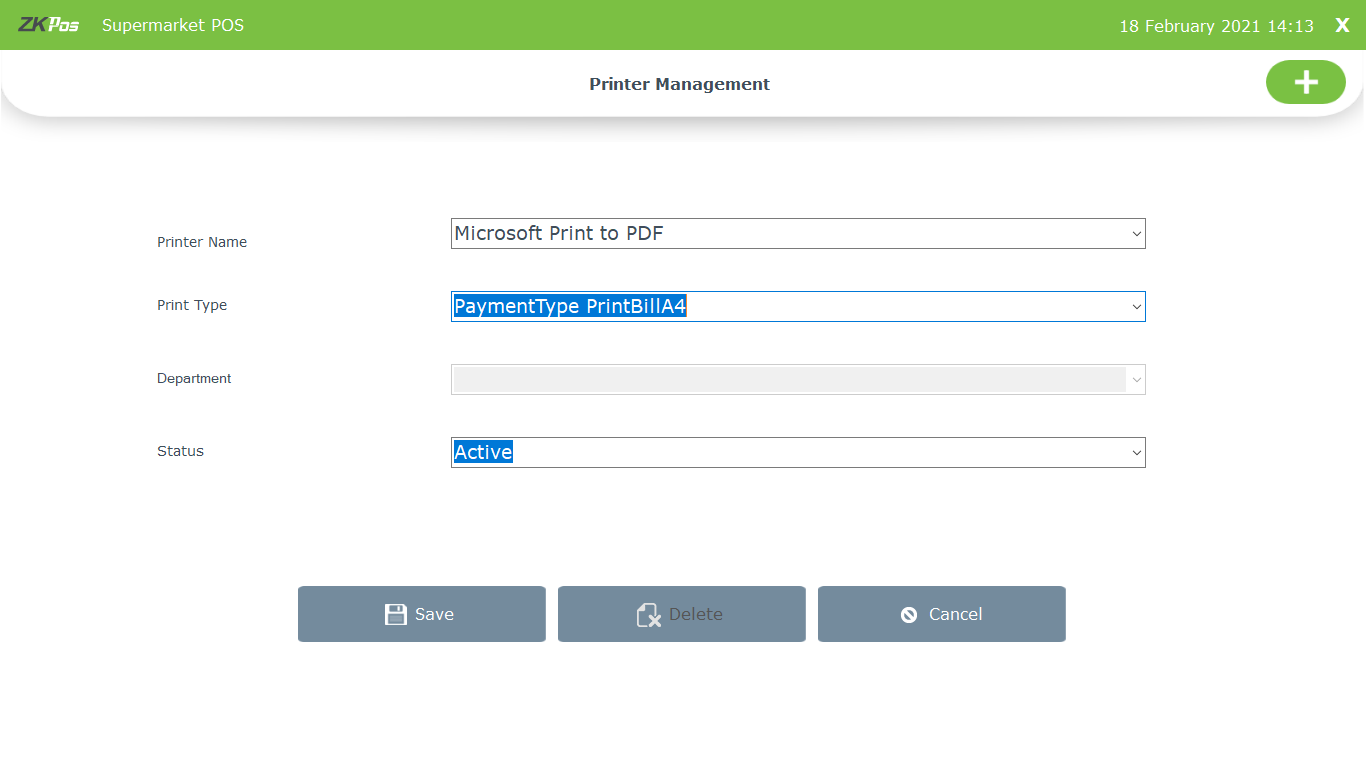
• Set Payment type print bill A4 by selecting the printer name
• Department field is automatically inactive if you select payment type print bill
• Select the status and click SAVE button
• You have to activate the ‘enable invoice print option’ from utility
• Now go to POS section
• Select the products
• Click settle button
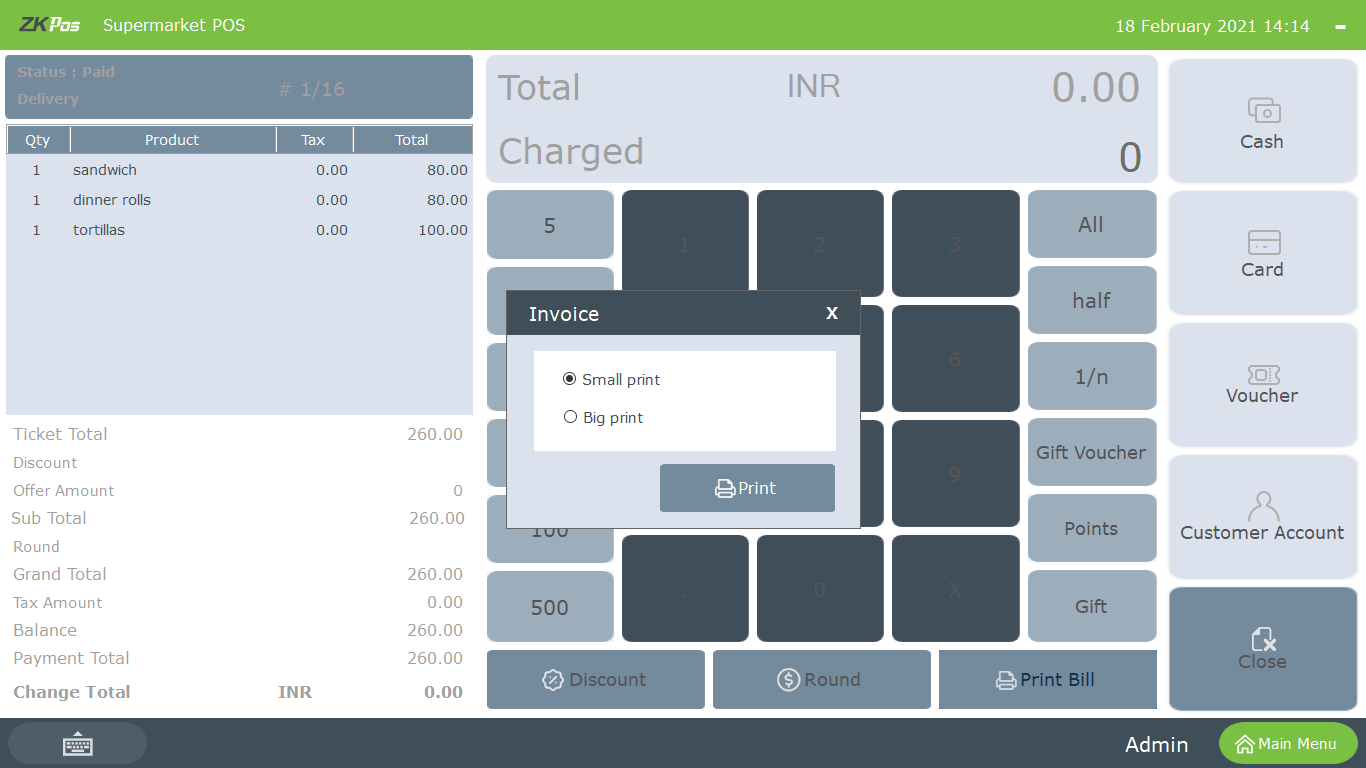
• Print bill option will be active now, click on it
• You will get a pop up asking small print or big print
• Select big print for A4 size print
-
How to set up different print types in ZKPOS Restaurant?
1) Ticket type print bill
Ticket type print bill is used to print the kitchen order ticket.
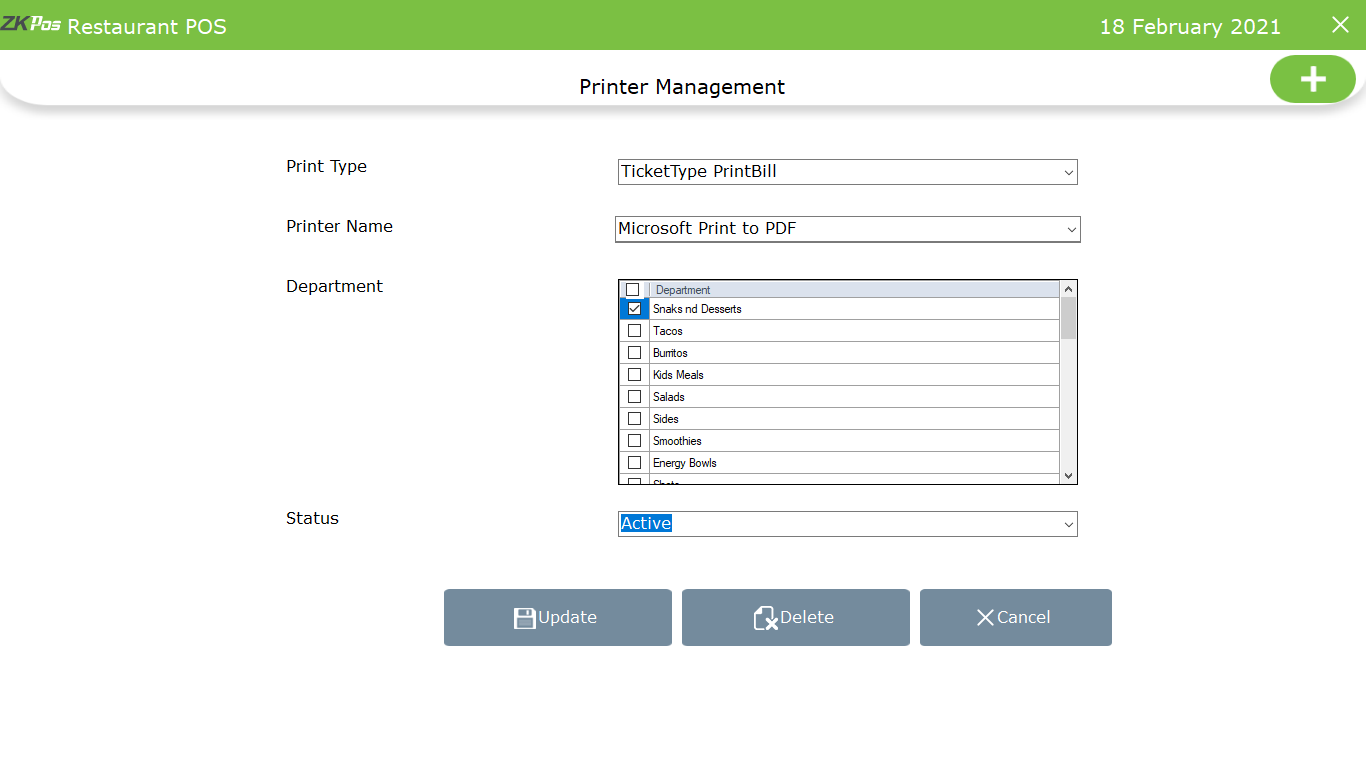
• From main menu, go to settings>> printer >> printer
• To add a new printer, click on add (+) button
• Select the printer name from the drop down
• Select the print bill as ticket type print bill
• Select the department or select all
• Enter status and click SAVE button
• Activate kitchen print and order print feature from utility.
• Now go to POS section
• Select the products
• Click send order
• You will get the print out from the selected product.
2) Payment type print bill
Payment type print bill is used to print the invoices, duplicate invoices and temporary bill
• Set payment type print bill by selecting the printer name
• Department field is automatically inactive if you select payment type print bill
• Select the status and click SAVE button
3) Normal type print bill
Normal type print bill is used to print all reports in software, customer account details and vendor account details, stock receiving, stock transfer, purchase order and food voucher

• Set normal type print bill by selecting the printer name
• Department field is automatically inactive if you select normal type print bill
• Select the status and click SAVE button
4) Label Print Bill
Label print bill is used to print the barcode for products.
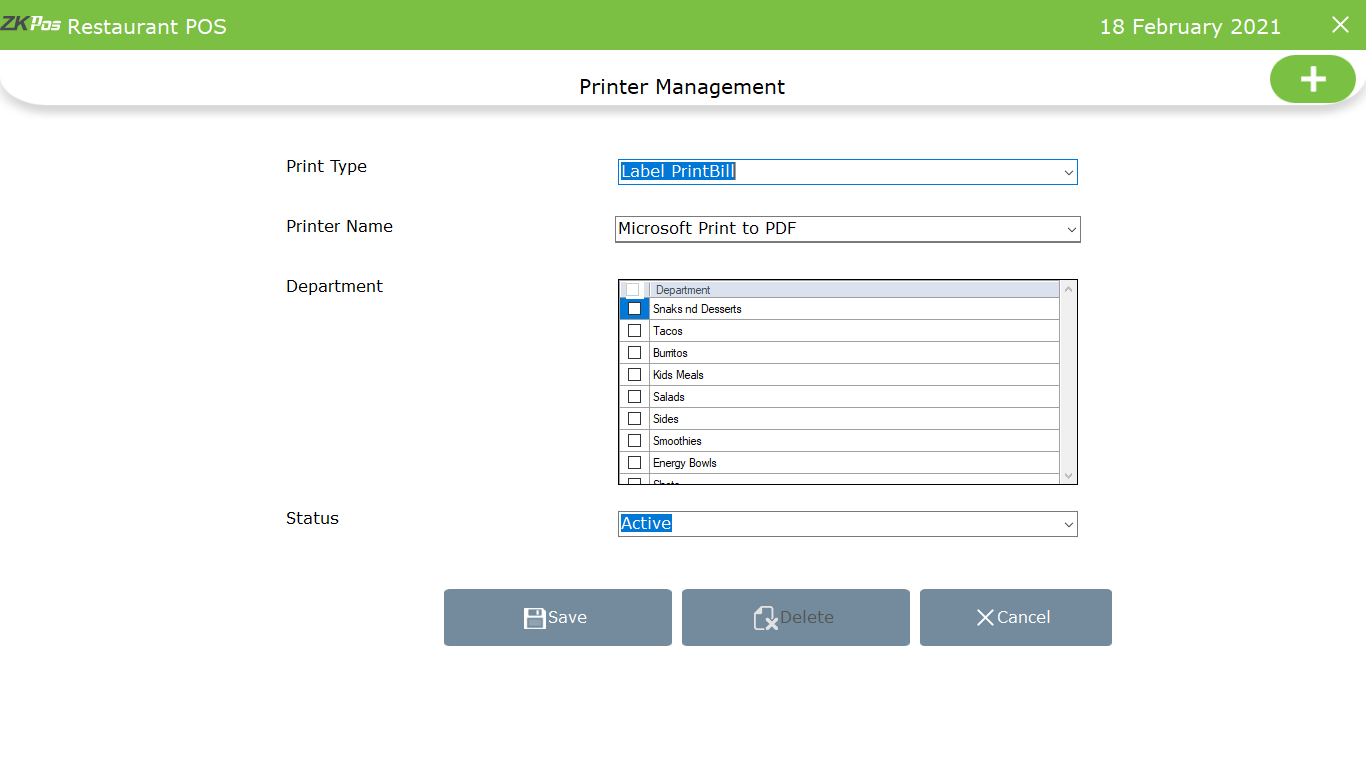
• Set normal type print bill by selecting the printer name
• Department field is automatically inactive if you select label type print bill
• Select the status and click SAVE button
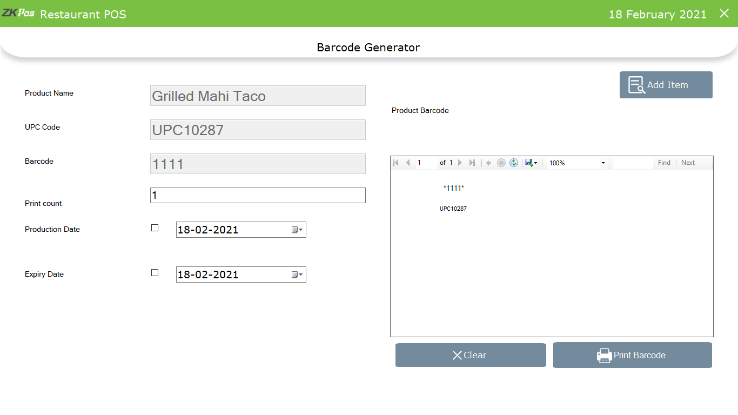
• Go to barcode generator
• Add item by scanning the barcode and click ‘print barcode’ option
5) Android Order Print
Android Order Print type used to print the send orders from ZKPOS Restaurant Android Order App.
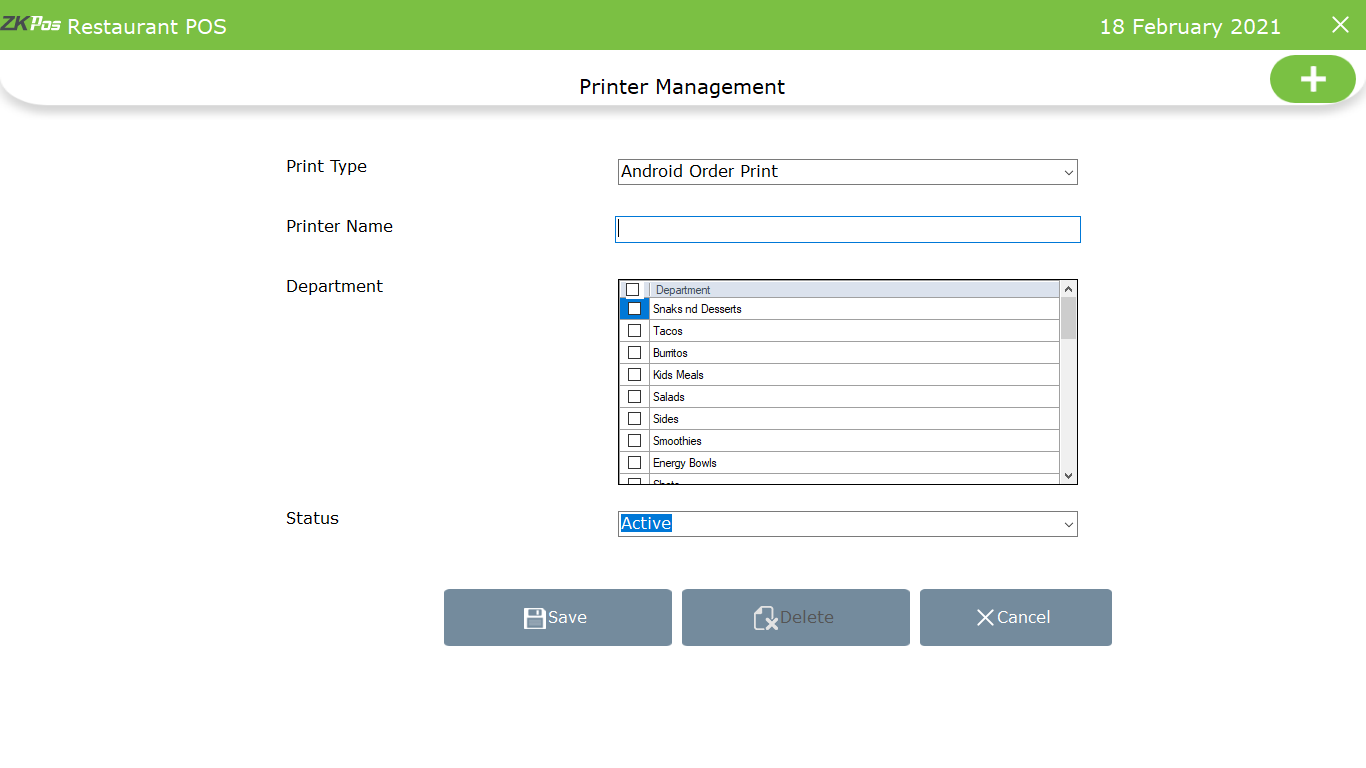
• Set normal type print bill by entering the printer name
• Department field is automatically inactive if you select label type print bill
• Select the department or select all
• Select Status and click SAVE button
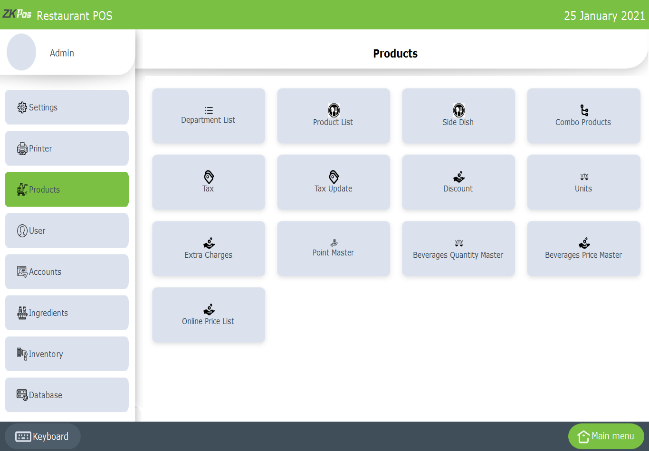
Product Related
-
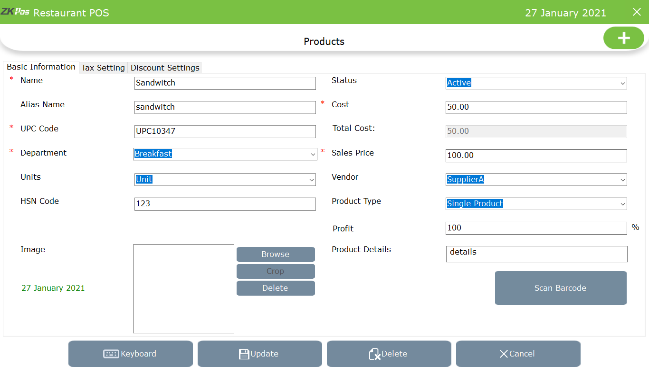
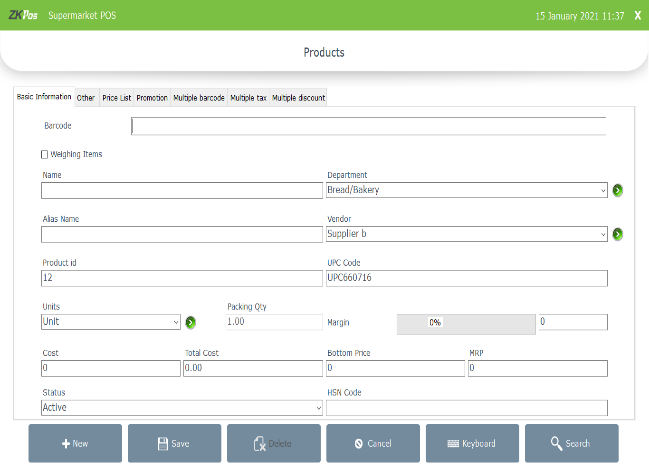
How Can I Add a Product in ZKPOS?
• Product details are entered and displayed there.
• Click on PRODUCTS LIST from products.
• Add all product’s details to ZKPOS Restaurant.
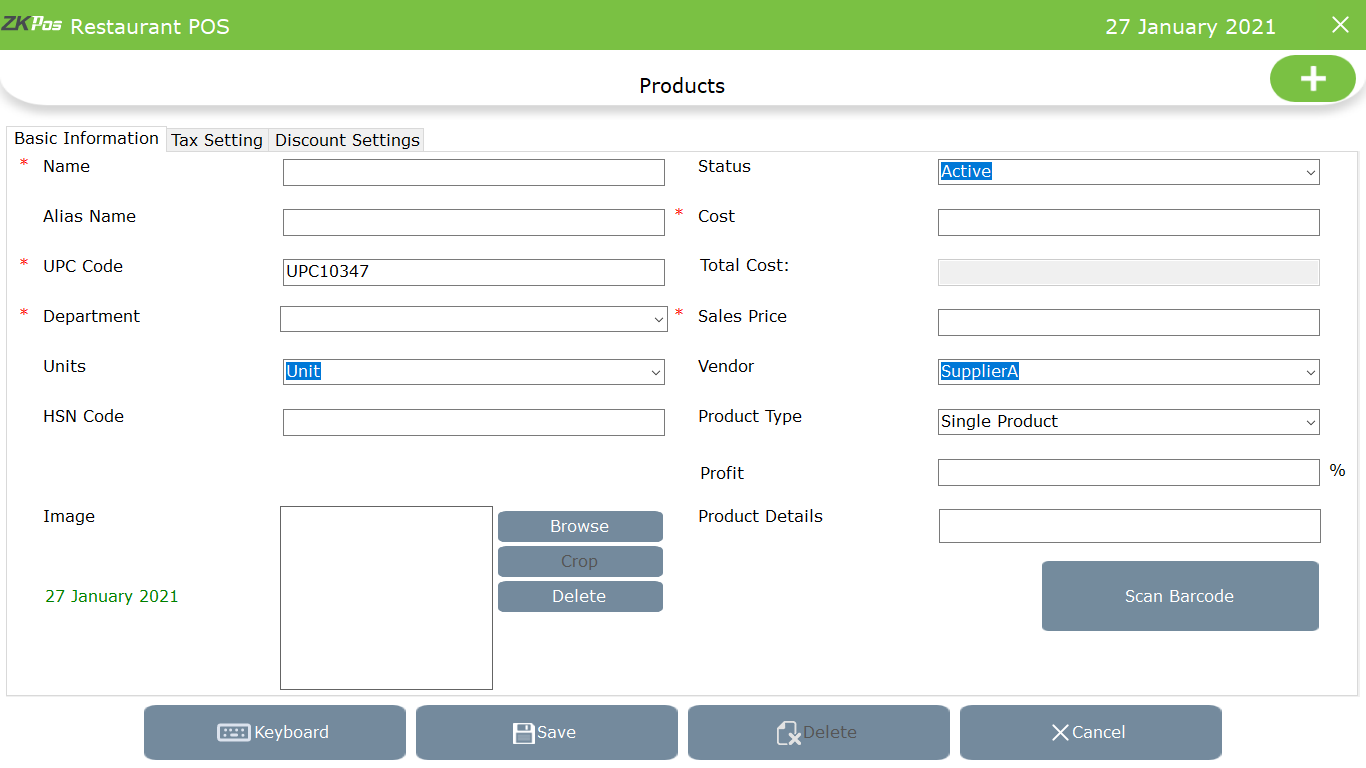
• To add a new product, go to SETTINGS.
• Click PRODUCT.
• From the menu options, select PRODUCT LIST.
• Then click ADD (+) button in option menu.
• UPC code is automatically displayed.
• Enter Product Name, Alias Name, Cost, And Sales Price.
• Choose Units, Status, Vendor, and Product Type.
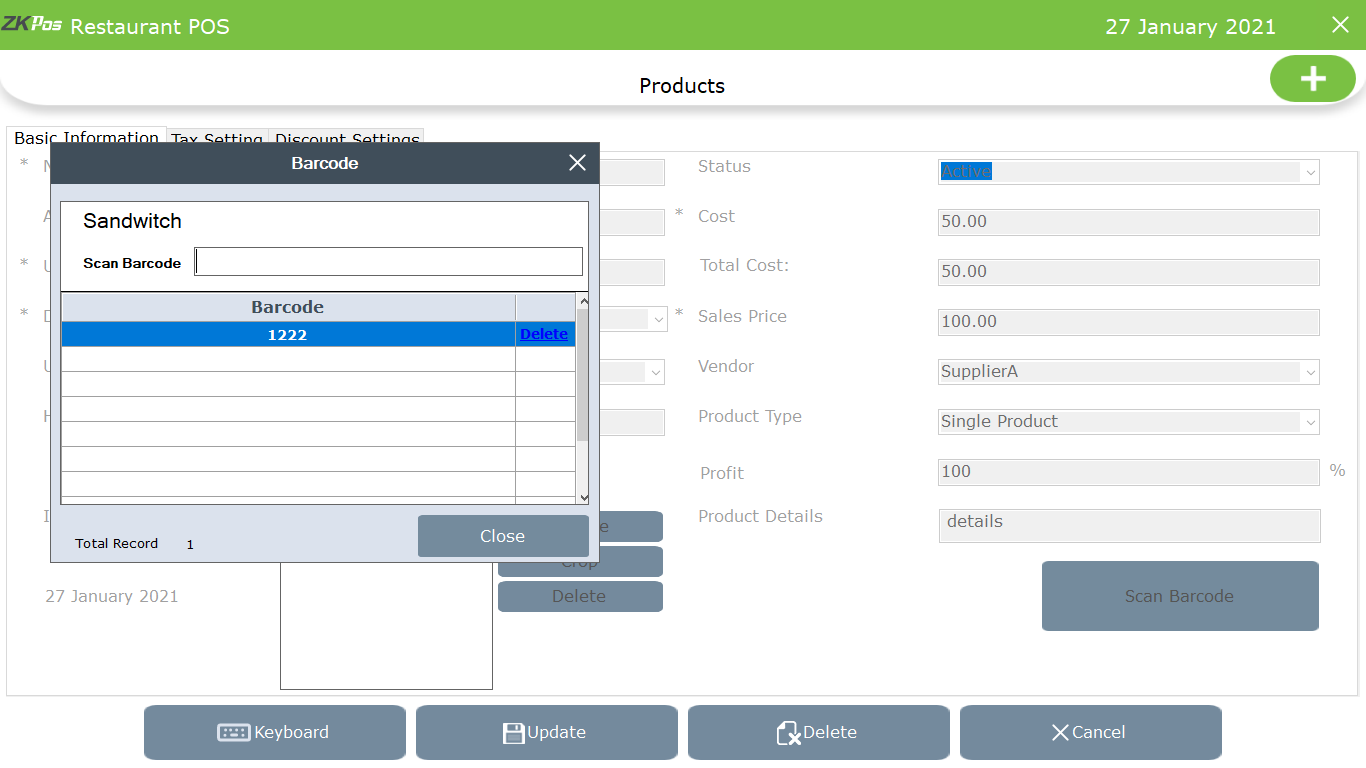
• You can scan barcode if the product has a barcode
• Click on scan barcode button
• You will get a pop up to show the barcode details
• Scan the barcode on the product using a barcode scanner
• You will get the barcode details at the interface
• Click CLOSE button
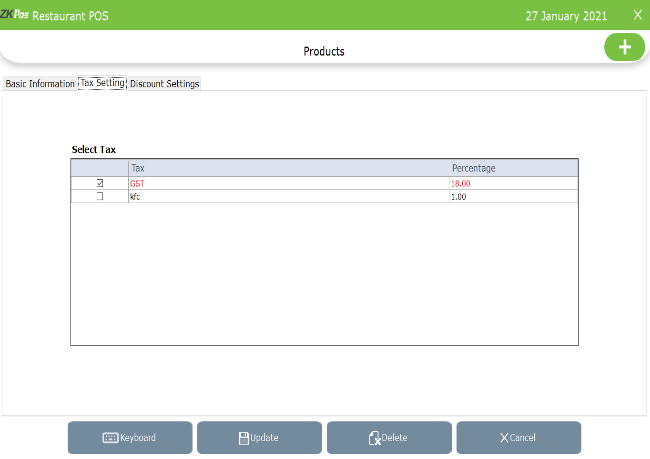
• In Tax settings select the tax for product from the saved details
• Active taxes are shown in this interface
• Default tax already in selection mode and in red colour
• Select the taxes for this particular product
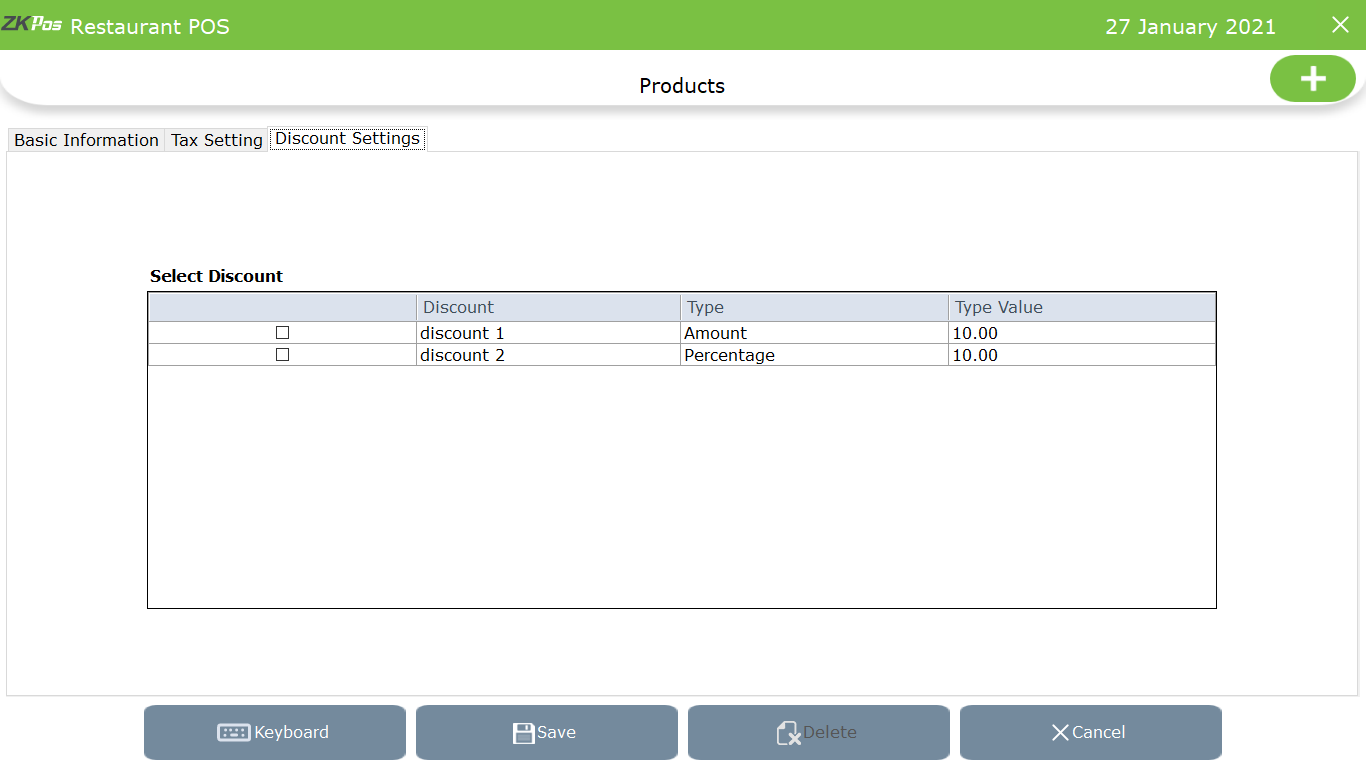
• In discount settings you can select the discount already saved in software.
• Tick the check box and click SAVE button
-
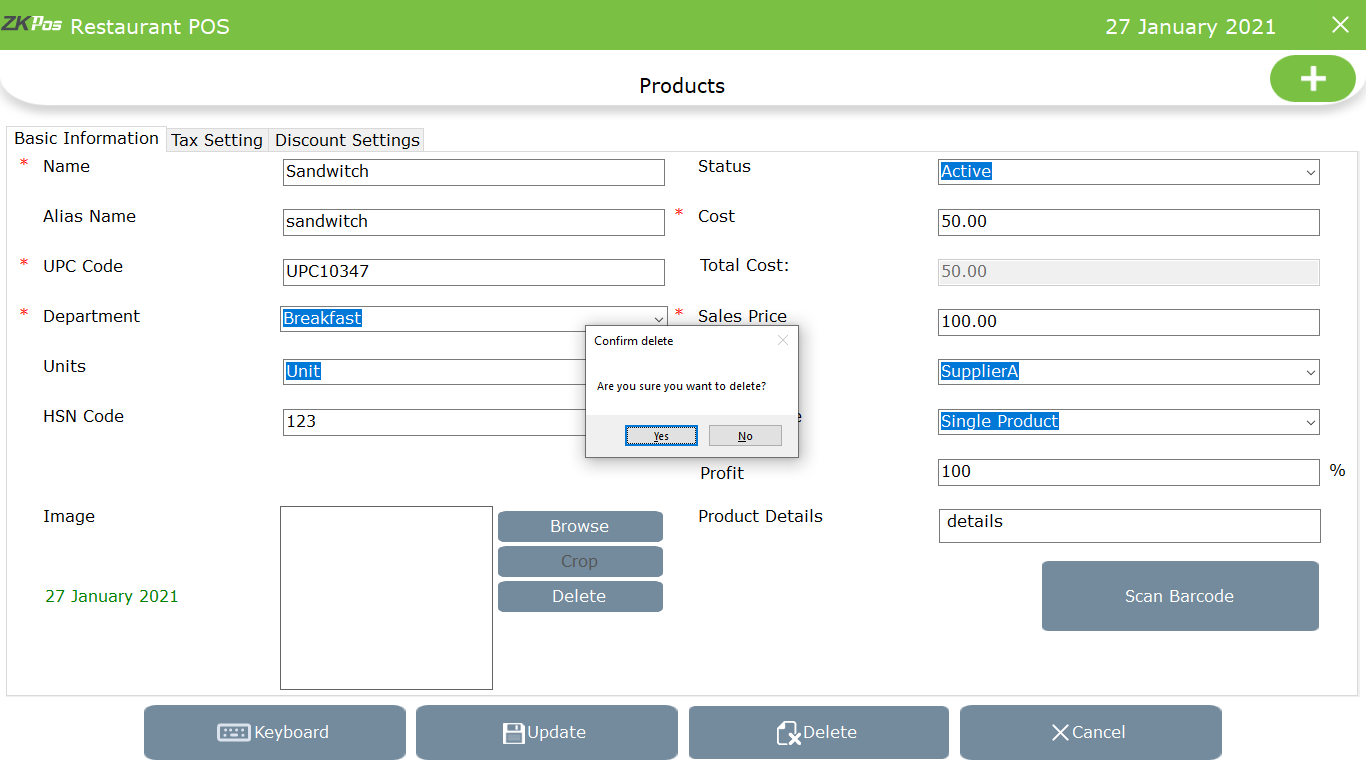
How to Delete a Product in ZKPOS?
• Go to PRODUCTS.
• Click on PRODUCT LIST.
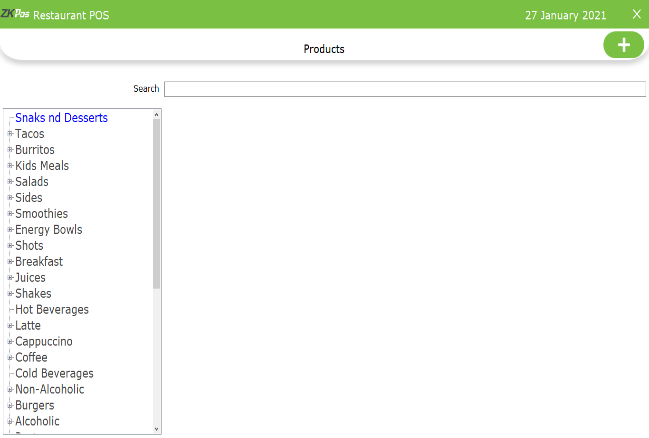
• Every saved Products will be displayed, you have to choose the Product that you want to delete by clicking the department on left side
• Now click on the delete button and YES in the confirmation pop up.
-
What is Sub Products, How can I add Sub Product?
A sub product is a secondary product that sell along with products in ZKPOS supermarket.
Enable sub products from utility Click sub products from products menu.
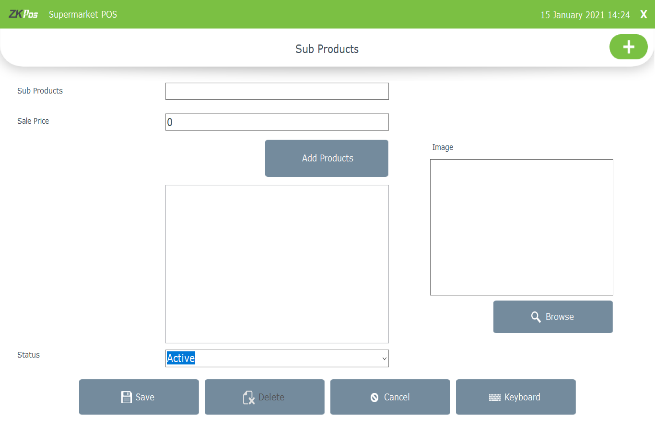
• Click add button.
• Enter sub product name and price.
• Now click on ADD PRODUCT button.
• Select the Department from the list. When you select the department, all product in that department will be displayed.
• Select the product from the list and click OK button.
• Browse the Image for the sub product.
• Save the details by clicking on SAVE button.
• If you want to remove a product, unclick the product from add products
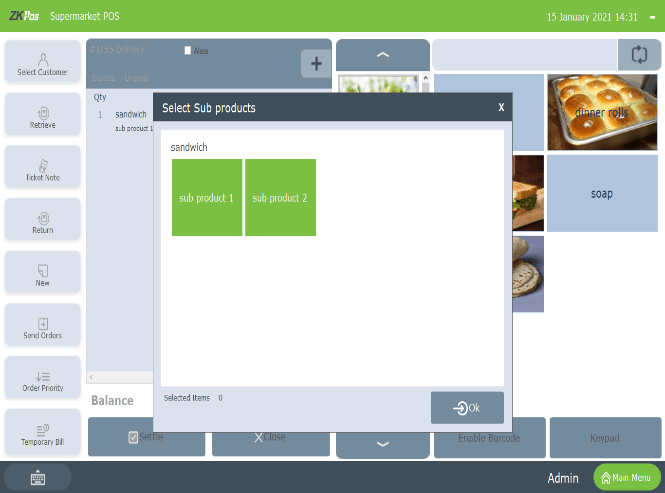
• Go to POS section from main menu
• Select an item which you set sub products
• A pop up will be shown contains the saved sub products
• Click on the sub products to select it
• Click OK button. The sub product will be shown under the product
• If you click ok button without selecting any sub products, product alone shown in the interface.
-
What is Combo Products, How can I add Combo Products?
Combo products contain two or more separate products packaged together in a single package or as a unit
• Go to SETTINGS.
• Click PRODUCTS.
• Click COMBO PRODUCT.
• Before adding combo items, you have to create a product named combo in product list as selecting the product as a combo product Now you can see the new created product in the drop down list of combo product
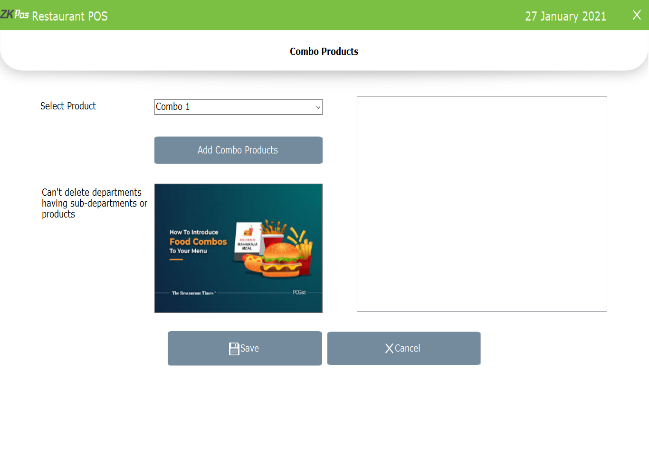
• Select the combo product from the drop down
• The image you saved in product list automatically appears there
• Click Add combo products button
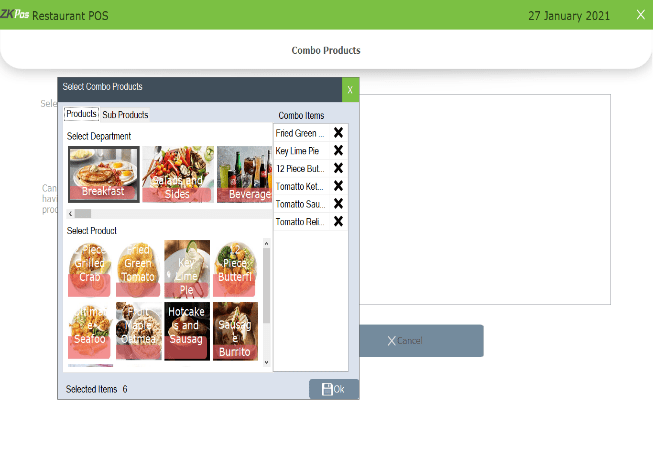
• Select products by selecting the departments from the pop up
• Select side dish by clicking on it.
• The selected products can be view as list as shown in the figure
• If you want to remove an item, click on ‘x’ button
• Click OK button after necessary changes and click SAVE
• You can sale the product as usual
-
How can I add Product image on ZKPOS?
Select Product from list, and click browse button near to image box. Select the picture and click open and save button.
-
Explain price list concept in ZKPOS Supermarket
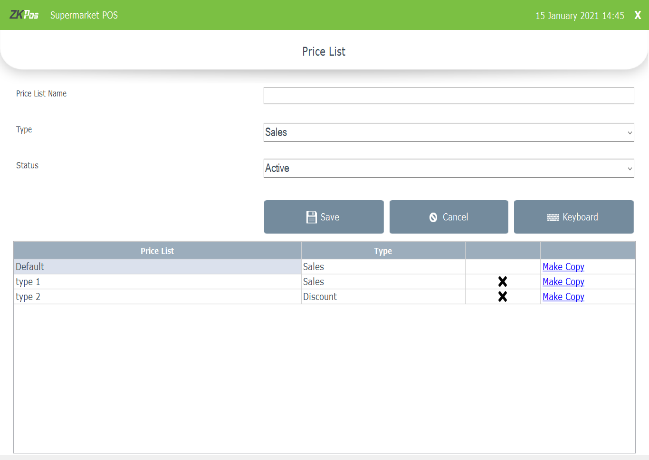
• Go to SETTINGS.
• Click on PRODUCTS.
• Select PRICE LIST from the menu options.
• Enter the PRICE LIST NAME.
• By default there will be two types of price list, SALES and DISCOUNT. Those products with discount offers should be added to the discount price list. Select the Price TYPE and STATUS
• Click SAVE button.
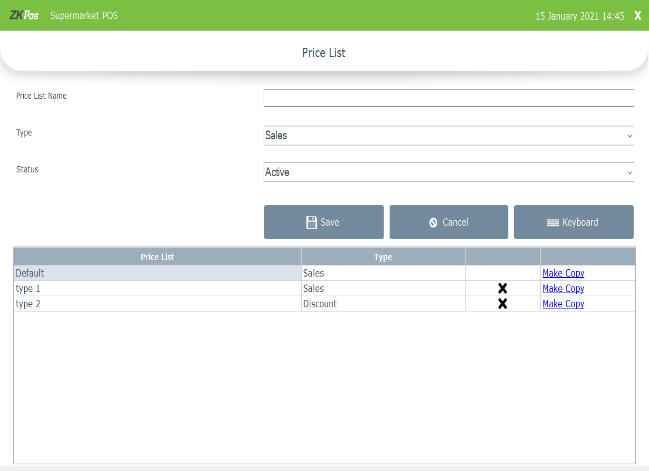
• Saved details will be displayed in the grid.
• Sometimes you may need to make changes to the price of particular products. So in such cases make a copy of the original price list by clicking on the make a copy next to the price list name, a copy will be created.
You can see all saved product price list in Product price list option. You can create more price list here. Suppose you want to change the price of the whole product. You can create a new price list and enter the new price for the products. Update the price list whenever you want to change the price without affecting the working of the POS software. You don’t need to change the product individually, which creates more confusions.
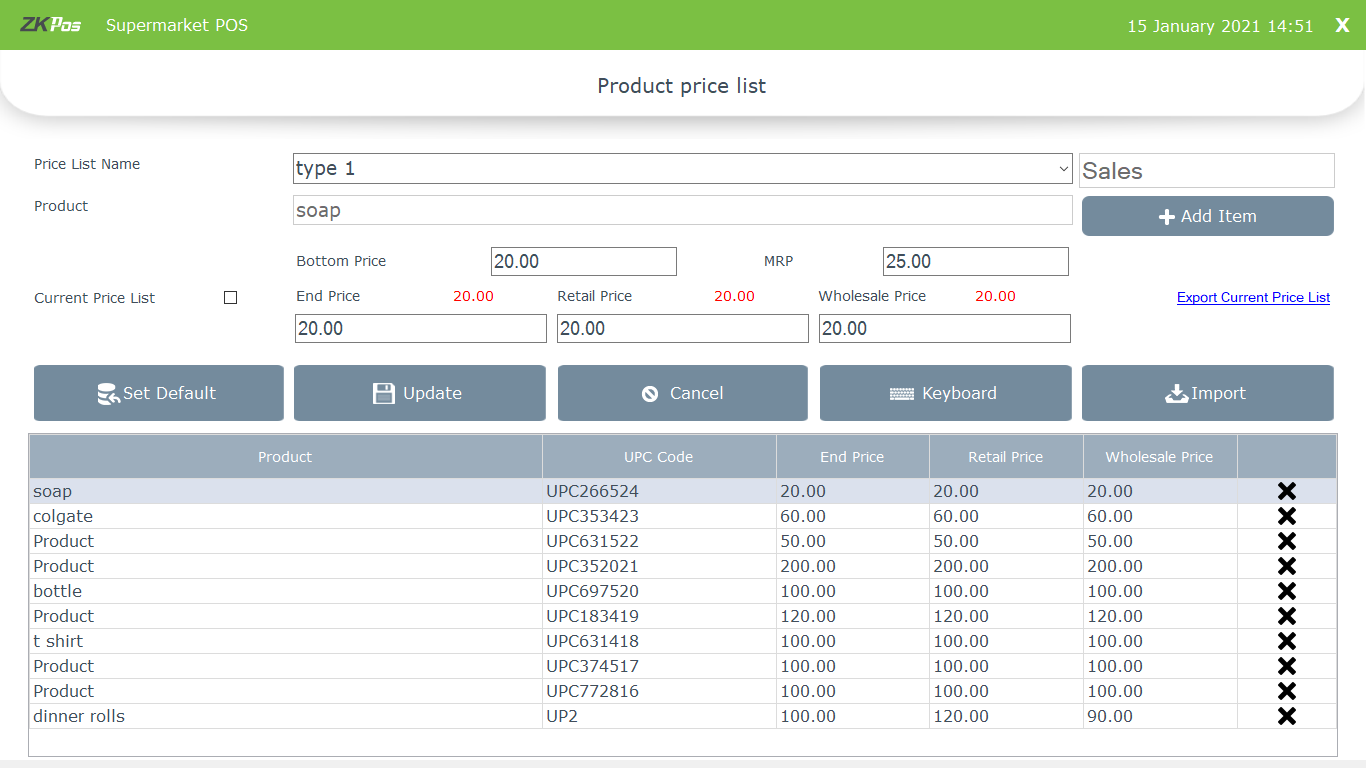
• Click on PRODUCT PRICE LIST.
• All Prices that you have added in the PRICE LIST will be displayed in the dropdown.
• To add new, select the price list name from the dropdown.
• There will be a default price list, if you want to add new select the price list name from the dropdown.
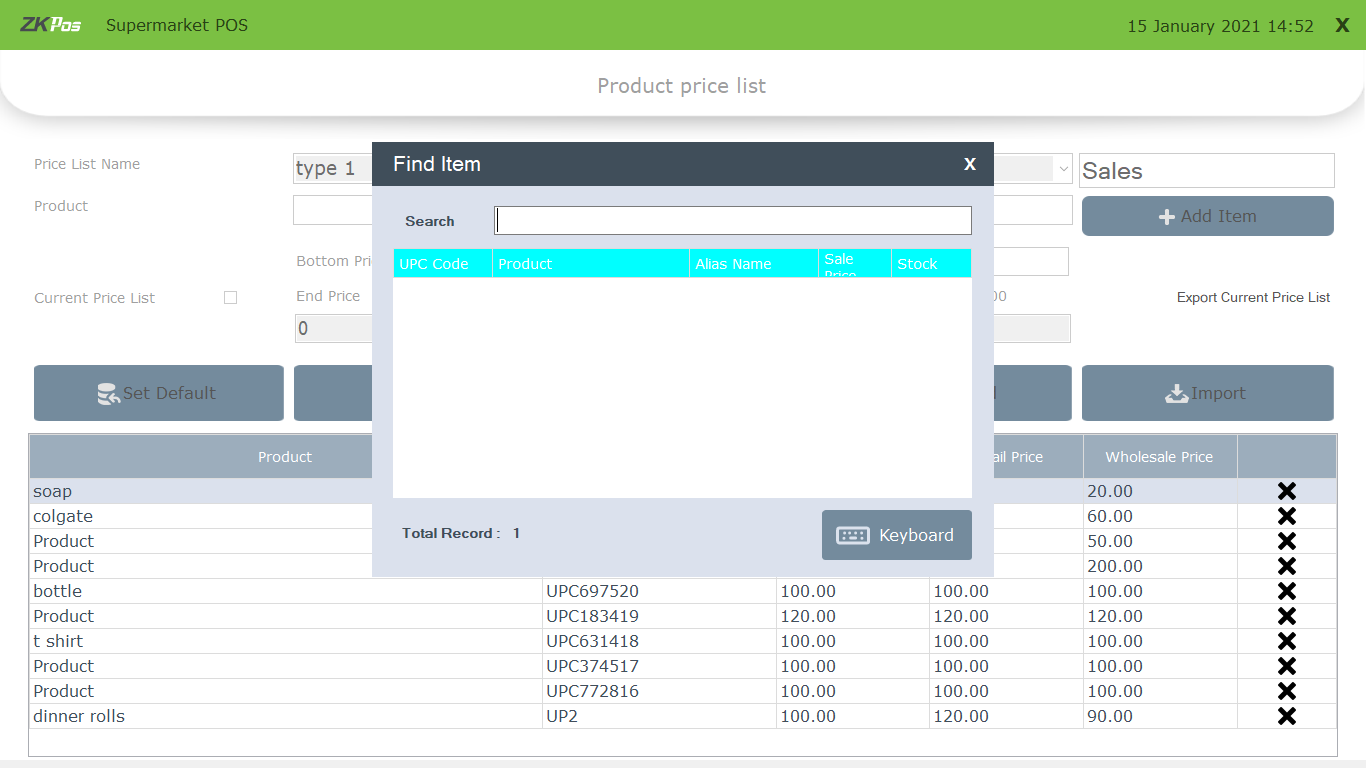
• Click on the ADD ITEM button to add a product.
• Where you are asked to scan the barcode if you previously enabled the barcode option in Utility.

• After adding an item bottom price , MRP and current price list details will be shown as shown in the figure
• Change the price list values – end price, retail price and wholesale price.
• Price list value should not be greater than MRP. Bottom price checking is based on the activation of ‘check bottom price’ option.
• Click update button
• You can create discount price list also.
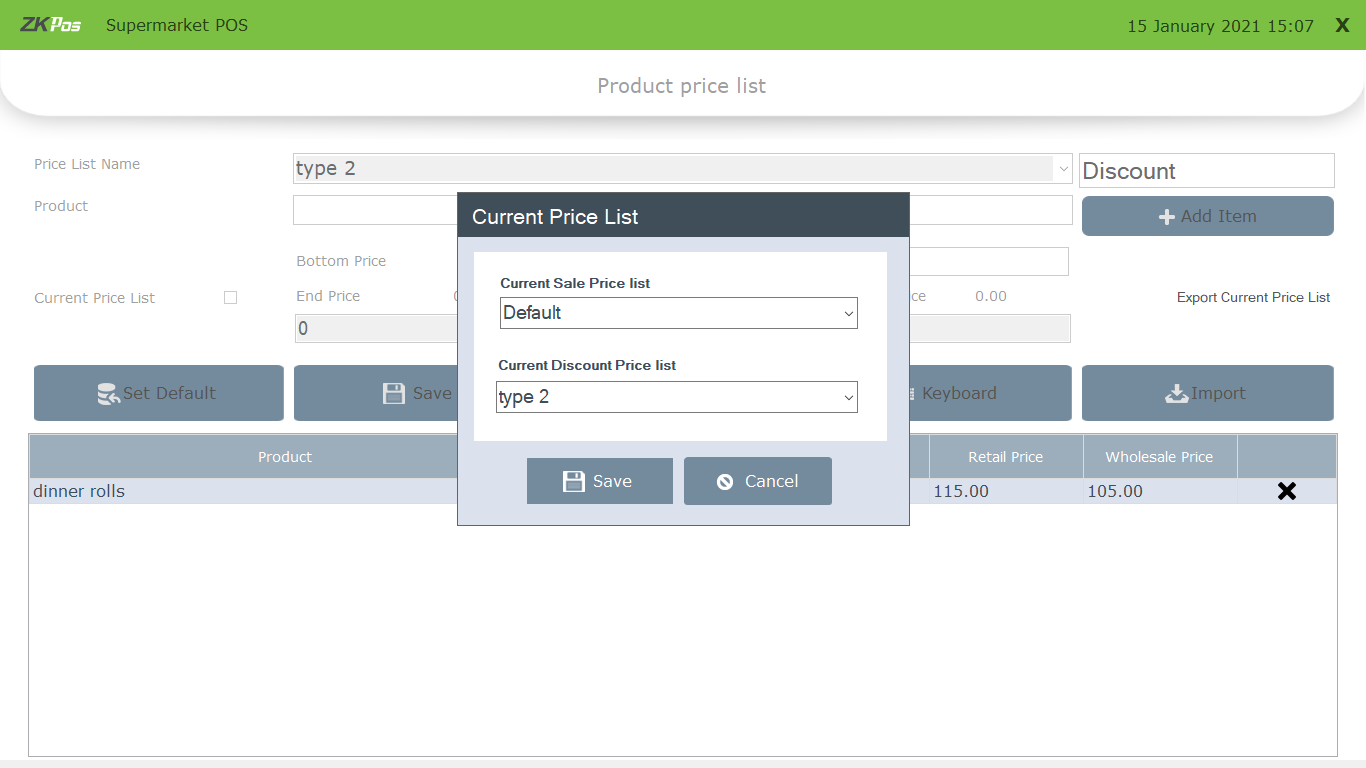
• Click set default button to set current sale price list and current discount price list.
• Current discount price list has the highest priority. If you select a product includes in both current sale price list and current discount price list, the software selects the price from current discount price list.
• If the barcode option in utility is disabled, you will asked to select the product.
• You can Import or export price list using the IMPORT button and EXPORT CURRENT PRICE LIST link.
-
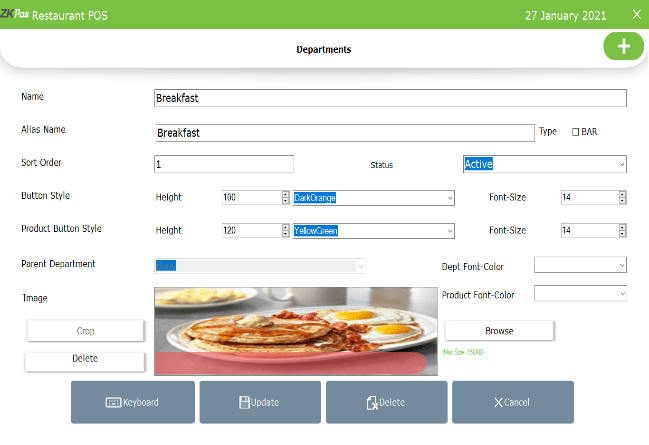
How can I create, Edit, Update and delete department in ZKPOS Restaurant?
A grocery retailer may feel difficulty in handling wide range of products. But you can manage them easily if you could categorize products into different departments. In order to do so, follow the steps below.
• To add a new department, go to SETTINGS.
• Click PRODUCTS.
• Click DEPARTMENT LIST.
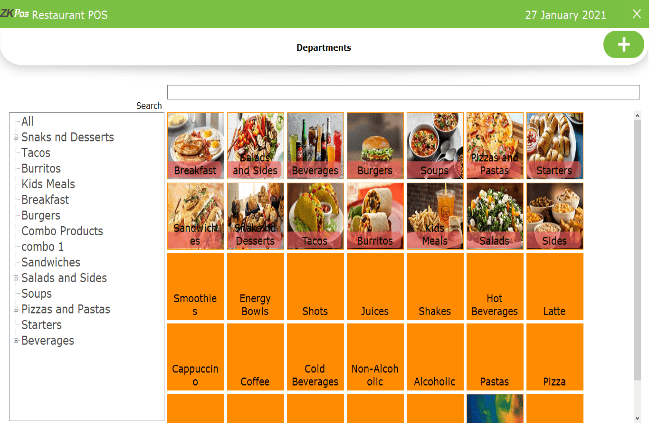
• Then click ADD (+) button in option menu.
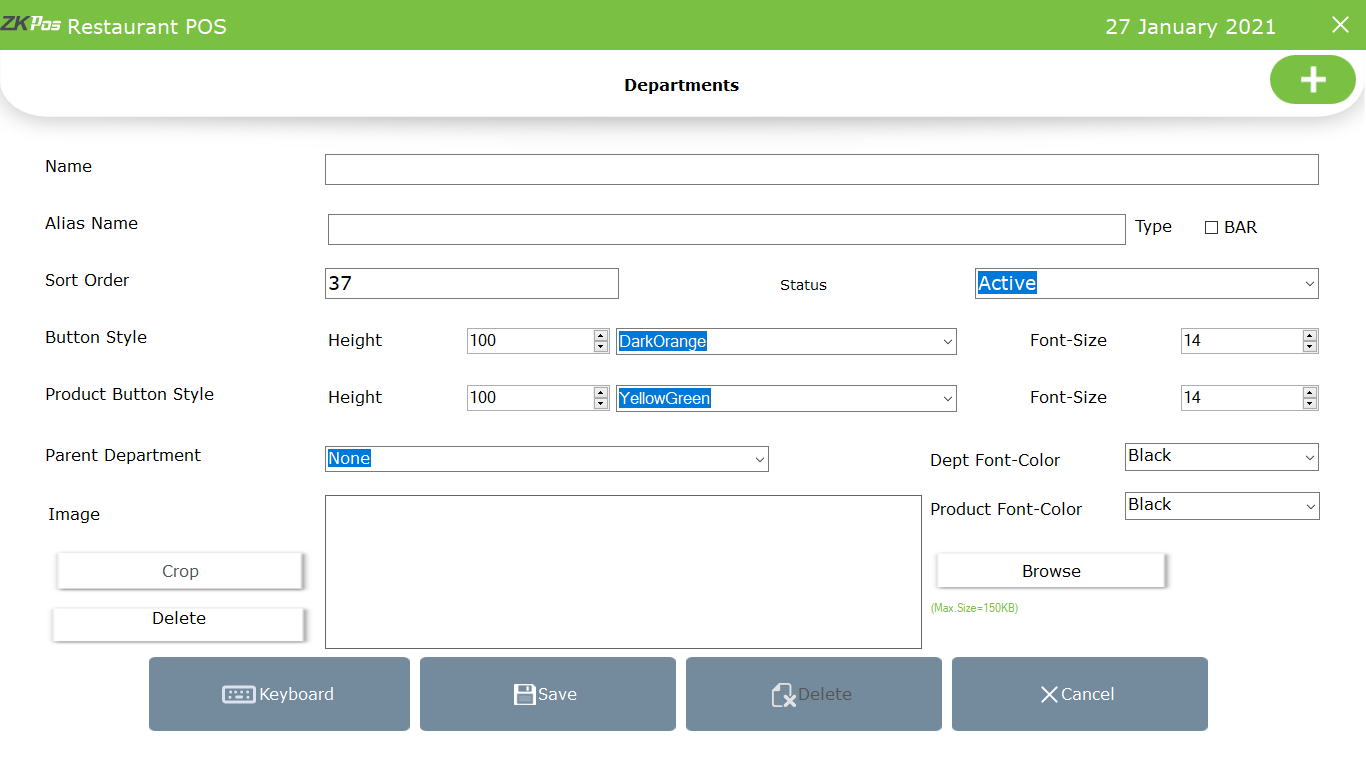
• Enter Department Name, Alias Name, Sort Order, Department, and Status.
• Choose Button style and Product button style
• Choose Parent Department.
• Choose Department font colour and Product font colour.
• Choose Image.
• Tick on the check box if the department belongs to BAR section
• The departments in BAR section will not be appeared in other order types
• Then Click SAVE AND OK button.
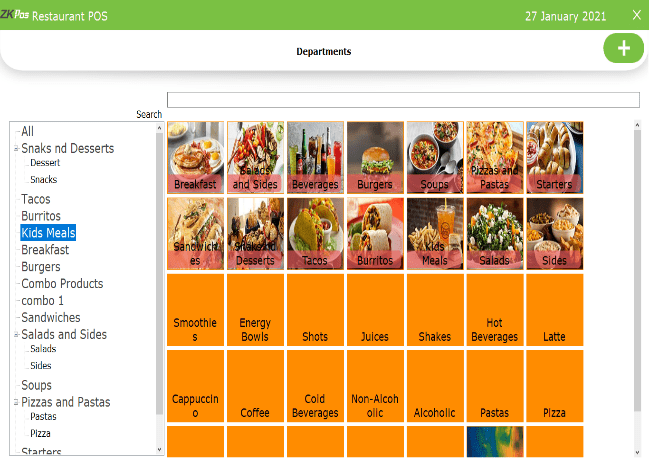
• Click DEPARTMENT LIST.
• To search a Department a search field is there.
• Go to SETTINGS.
• Click on PRODUCTS.
• Click on DEPARTMENT.
• Every saved Department will be displayed, you have to choose the Department that you want to edit/ delete.
• If you want to edit, then make necessary changes and click OK button.
• Now click on the delete button and YES in the confirmation pop up if you want to delete the department
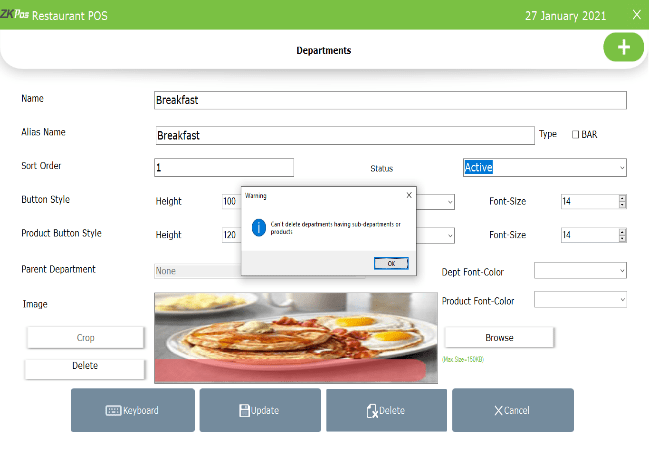
• You cannot delete departments having sub departments or products
• How to add and manage weighing items in ZKPOS supermarket?
-
Add a new weighing item to ZKPOS Supermarket software.
To add a new product, go to SETTINGS.
• Click PRODUCTS.
• From the menu options, select PRODUCT LIST.
• Enter the barcode of the product in the field provided.
• If the product is a weighing item then, tick the checkbox corresponds to weighing items.
• Enter the details in corresponding field.
• Click on WEIGHING ITEMS. Product, Current Price, New Price, Weighing Number will be displayed.
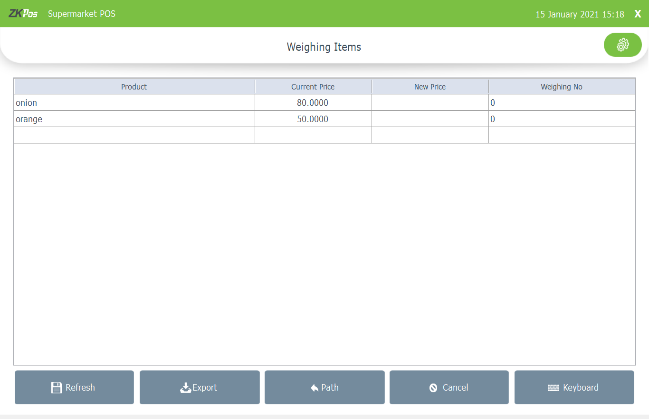
• You can update the price in new price.
• Enter the new price and click enter
• Click refresh button to change the new price to current price
• Weighing number is the identifying number given to weighing machine to identify the product.
• Export the weighing items by clicking the export option.
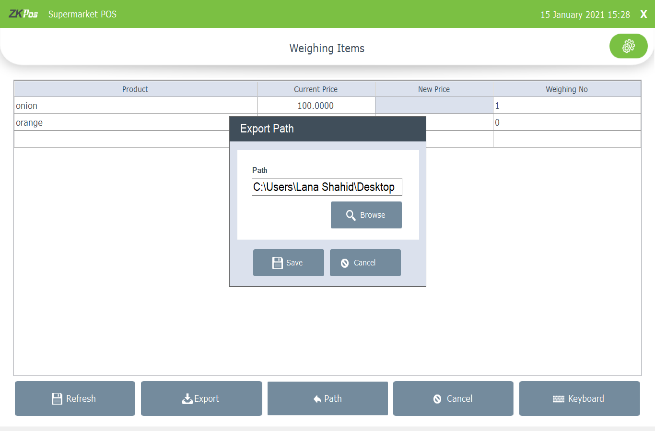
• If you want to change the export file path click path button
• Select the location by browsing and click save
• Click on settings button at the right top end of the screen
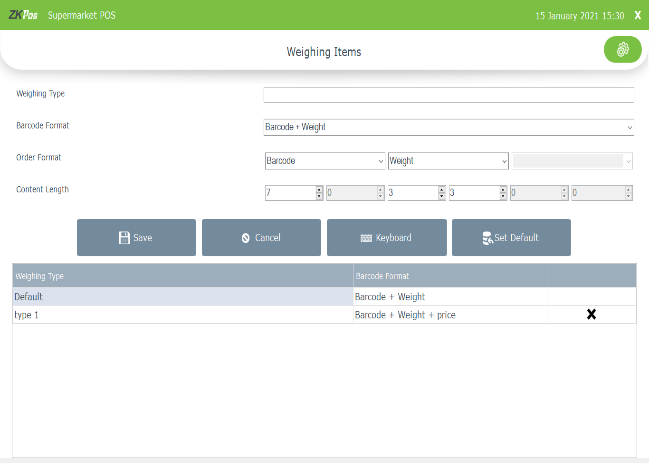
• You are redirected to a screen as shown in figure
• We can set barcode format here
• Enter the weighing type name
• Select the barcode format
• Select the order format and order length
• As per the barcode format, order format and order length barcode generator generates the barcode
• Click save button
• To set the default weighing type click set default button
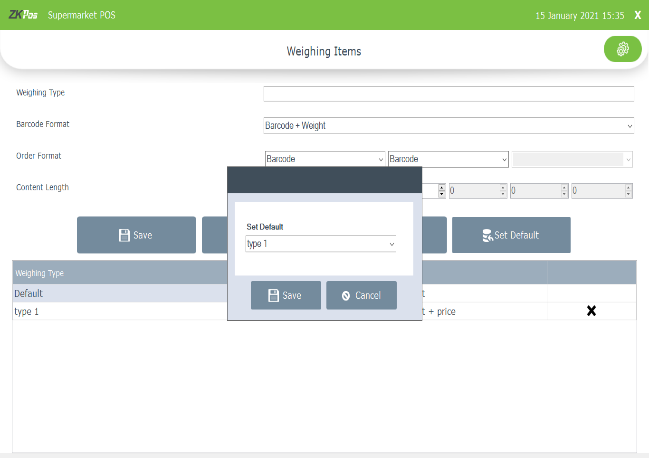
• Select the weighing type from drop down
• Now click SAVE button.
• How to return an invoice in ZKPOS Software?
-
To return a product, click return button.
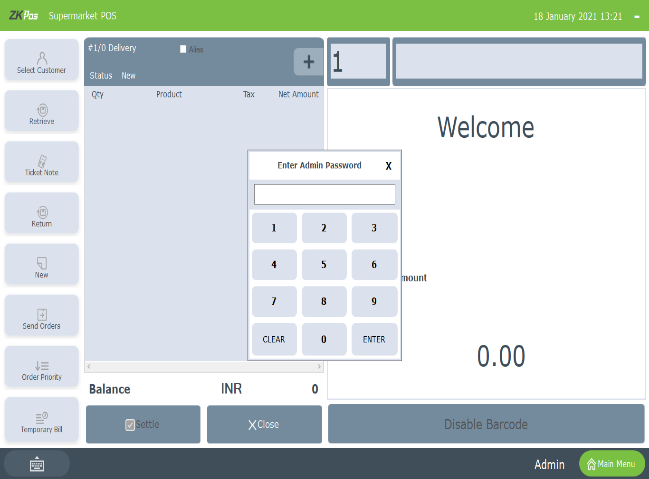
• Enter admin password.
• Enter invoice number you want to return.
• Click yes to the confirmation message if you want to return all item otherwise click no.
• If you want to return all items continue for the settlement.
• If you click no for the confirmation message, select items from the right-side menu.
• While selecting items, select from the pop up shown either product only or sub products
• Click settle button for settlement.
• Activate the option easy return from utility

• You can return products without entering the invoice number after admin password
• Inventory
Inventory
-
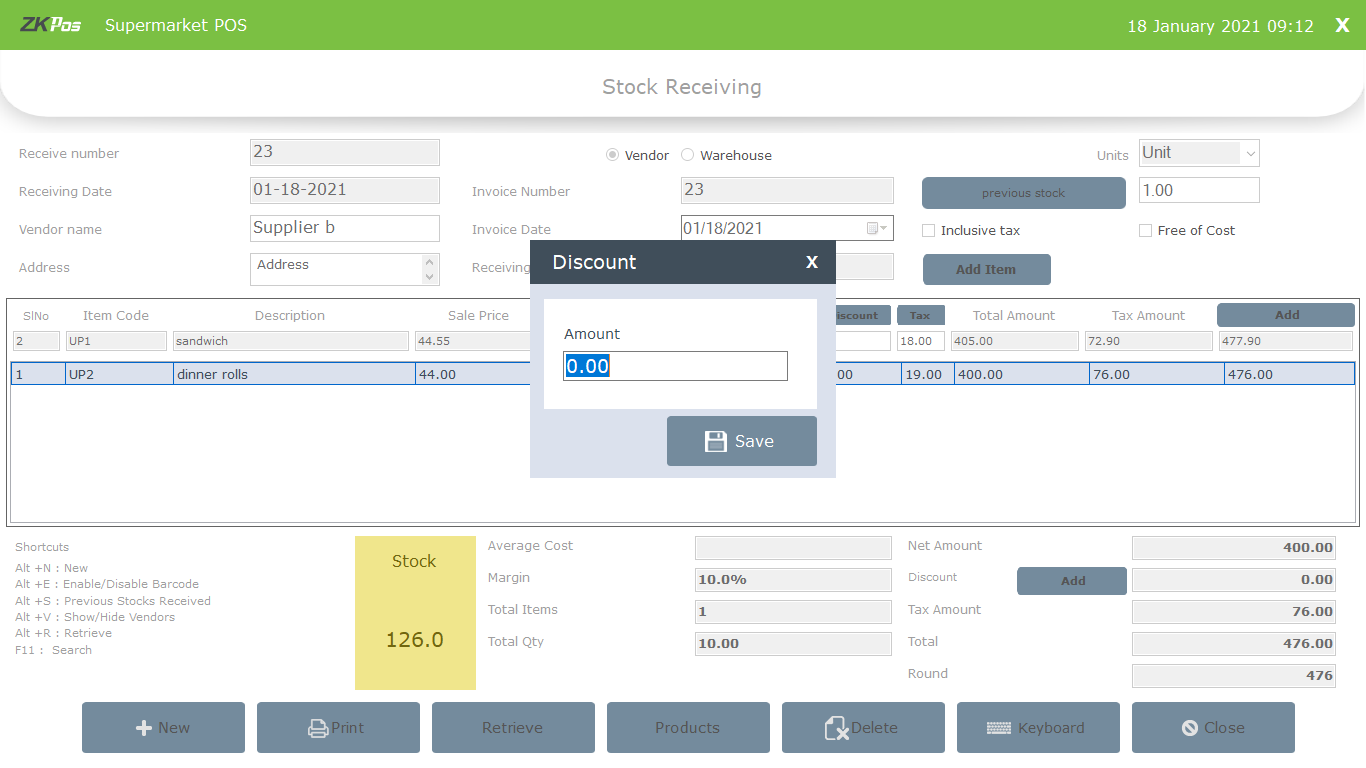
How to receive stock in ZKPOS Software?
Save the stock receiving details in ZKPOS.
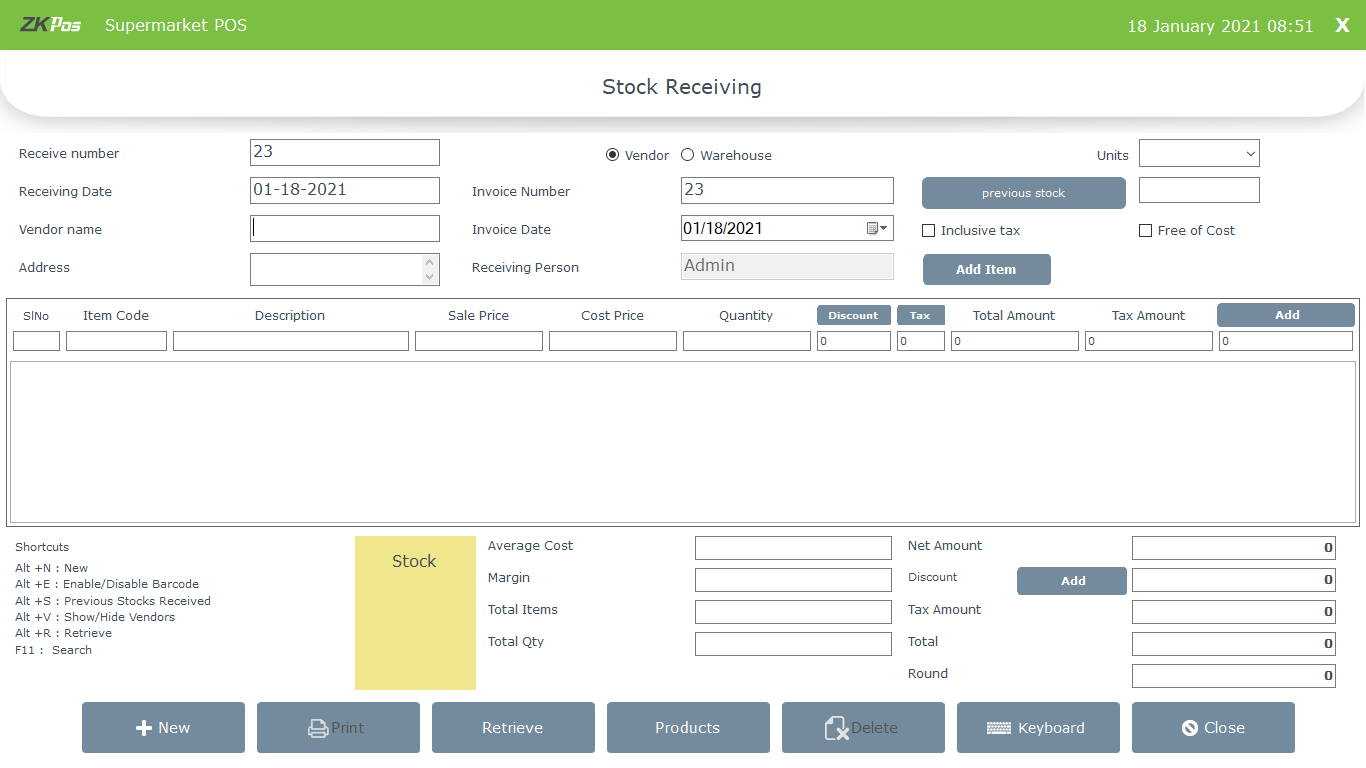
• Click SETTINGS, from the menu options select INVENTORY.
• First let’s learn how to do STOCK RECEIVING. Click on STOCK RECEIVING.

• You need to specify the details about the purchase in appropriate field, like INVOICE DATE, RECEIVING DATE, VENDOR NAME, VENDOR ID, VENDOR’S contact details, ITEMS that purchased, PACKING QUANTITY, TOTAL AMOUNT, NET QUANTITY, tax and discount details etc.
• Select whether you receive this stock from a vendor or from a warehouse

• Click inclusive tax option if you want to calculate the tax inclusively. You have to calculate the tax for the whole invoice inclusively
• By clicking free of cost option, the cost price of a product did not update in product list if you change it.
• You can also restrict the updating of cost price in product list by enabling ‘disable cost update on stock receive’ from utility
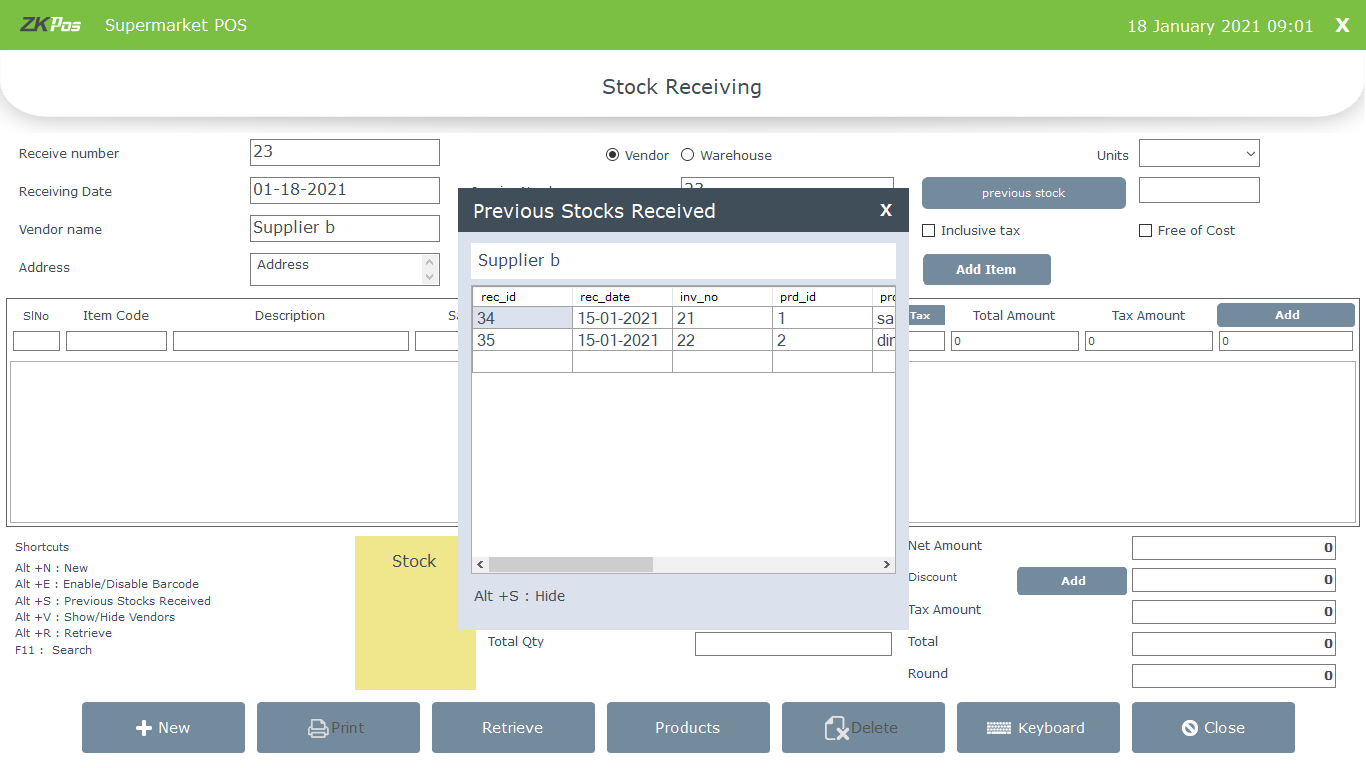
• After selecting the ware house/vendor, click on previous stock button

• On clicking the previous stock (Alt + S) you can see the previous stock received from the selected ware house

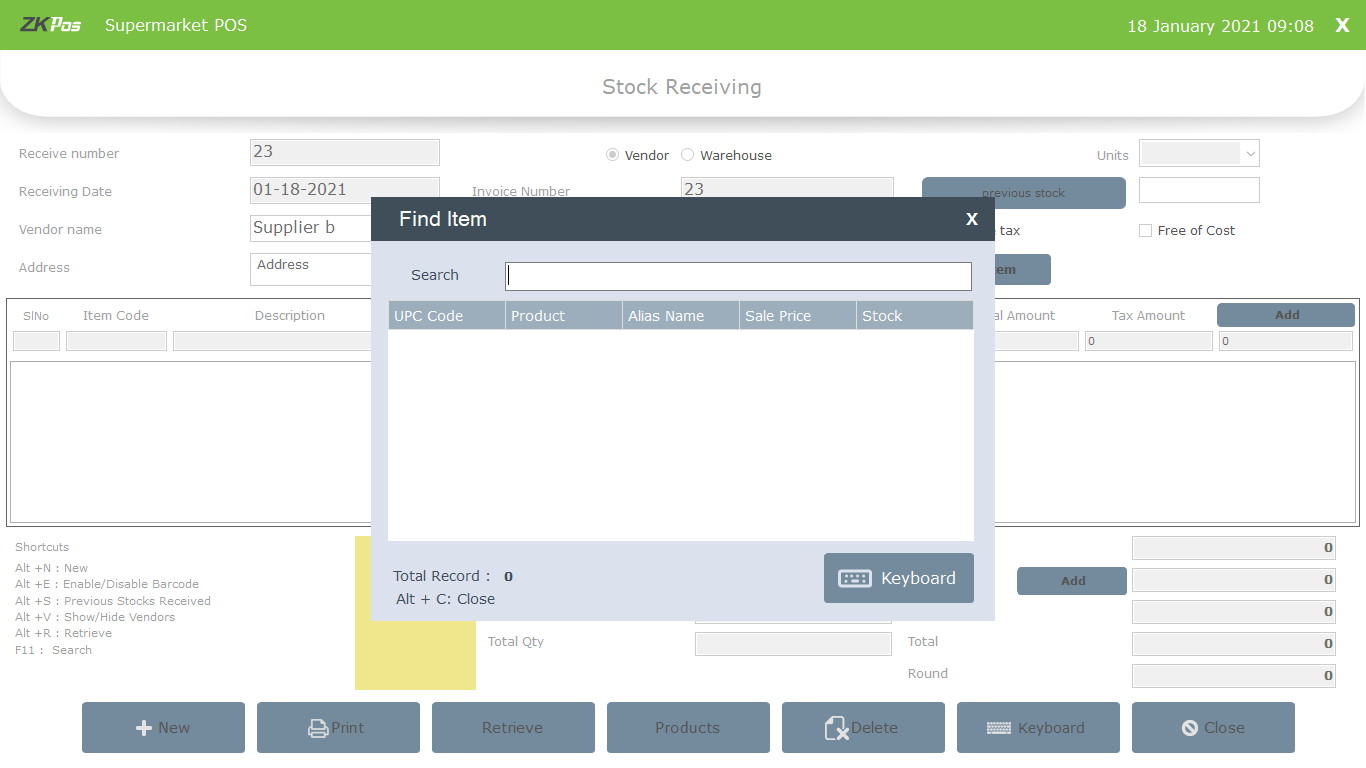
• Click add item to select the products
• Enter the barcode or search by product name
• click on the product after searching
• Now the product will be shown in the purchase receiving grid
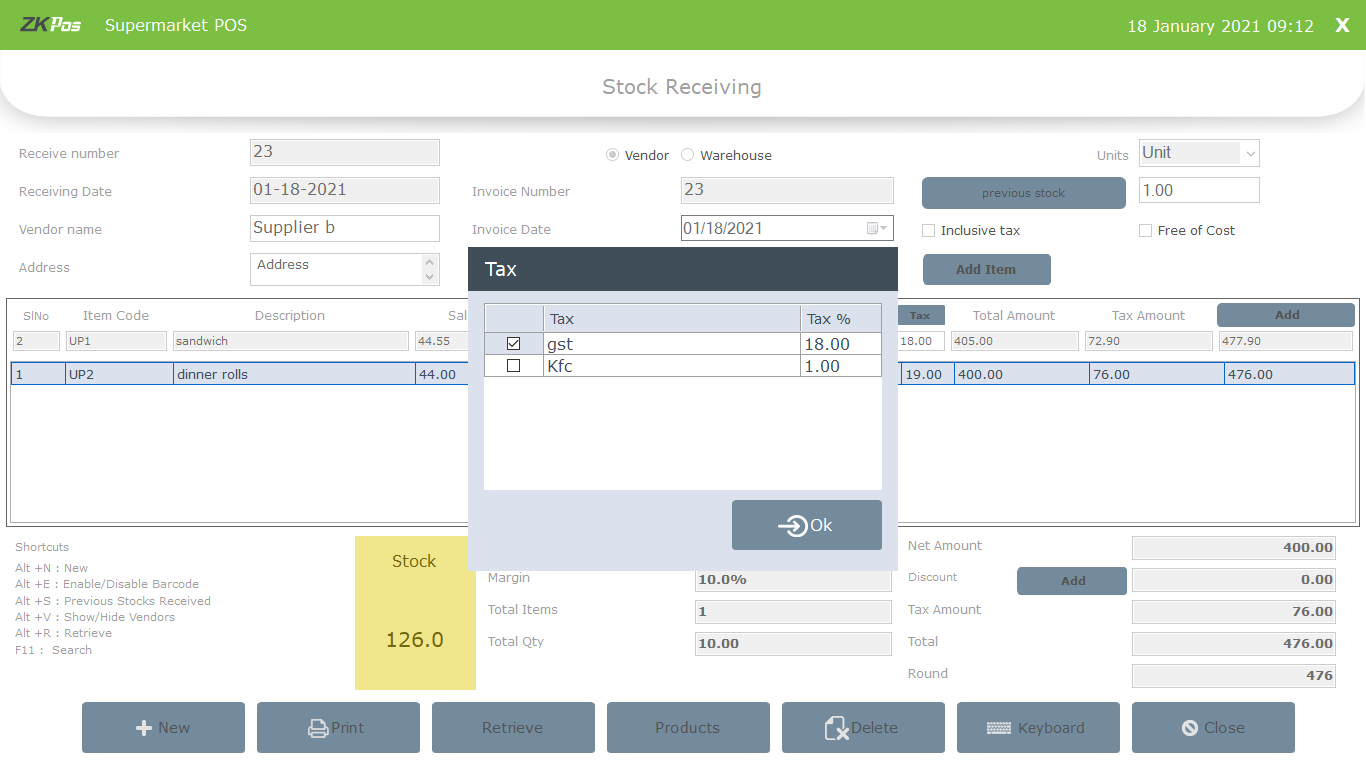
• Change the cost price if you want to
• Enter the quantity
• After entering the quantity, you can add discount and tax product wise
• Click on discount button against the product
• You will get a pop up to enter discount as amount and as percentage
• By entering the percentage value you can view the amount in the respective field
• If you enter the amount, click the % button you can see the equivalent percentage value in the respective filed.
• Click OK

• Click tax button same as discount
• You can get a pop up shows the saved taxes in the software
• Select/deselect the taxes
• Click OK

• Click ADD button inside the product list grid to save the receiving details
• When you select an item the average cost will calculated by considering the reception of same item previously and view in the respective field
• You can add discount to the whole invoice by clicking the add button near the discount amongst the amount details
• Enter the discount amount and click OK
• You cannot add both product wise and invoice wise discount to a single invoice
• Click add item for adding more products to the same invoice.
• Click new button to start a fresh invoice
• By clicking print you can take a print out of the details
• You can create products from the purchase receiving interface by clicking Products button
• Delete the invoice by clicking delete button
• Keyboard will help you to enter letters and numbers
-
How to create Purchase Order in ZKPOS Software?
If you have received a purchase order from a vendor or customer, then add the details to ZKPOS.
• Click on PURCHASE ORDER.
• Select the vendor name.
• When you select the vendor, other details will be updated automatically.
• Now click on ADD ITEM button.

• Select any from the list.
• Enter the quantity that you want to purchase.
• Select tax
• Press enter key.
• Your entry will be updated successfully.
• Enter the shipping amount by clicking add button near to it.
-
How to retrieve stock receiving details in ZKPOS Software?
• To view previous stock entries, click RETRIEVE button. In the new window enter the INVOICE NUMBER and click search button.
• Choose vendor wise option to view vendor wise results. Now select the vendor from the list. You will get the results.
 Contact Us


